
Hector | House Care Compass
How Long Do Sewer Lines Last? Materials, Age, and Warning Signs

Last updated: September 2026
A buried sewer line can last for decades, but there’s no single age when every line suddenly needs replacing. The pipe material matters, and so do soil movement, tree roots, installation quality, slope, corrosion, and past repairs. For homeowners, age is a clue, not a diagnosis. An older line with good structure and flow may still have years left, while a newer one can fail early from roots, poor installation, or ground movement.
Quick Answer: How Long Do Sewer Lines Last?
- Orangeburg (fiber pipe): commonly cited around 30 to 50 years, the shortest-lived material.
- Clay: about 50 to 60 years on average, though sound clay pipe can last longer.
- Cast iron: roughly 50 to 100 years, depending on corrosion and conditions.
- PVC / ABS plastic: often 50 to 100+ years when properly installed.
- A lifespan estimate isn’t a replacement deadline. Recurring backups, roots, cracks, corrosion, sags, or collapse on a camera inspection matter more than age alone.
Typical Sewer Line Lifespan by Material
| Pipe Material | Typical Lifespan | Common Weak Points |
|---|---|---|
| Orangeburg (bituminized fiber) | About 30 – 50 years | Softens, flattens, blisters, and can collapse |
| Vitrified clay | About 50 – 60 years on average | Many joints that can separate, shift, or let roots in |
| Cast iron | About 50 – 100 years | Internal corrosion and scale; cracks or holes over time |
| PVC / ABS plastic | About 50 – 100+ years | Poor installation, settling, joint movement, physical damage |
Ranges compiled from Angi and HomeGuide national data and commonly cited industry estimates. Published figures vary, so treat these as planning ranges, not promises.
Unlike a water heater, a buried sewer line doesn’t come with a sticker telling you when to replace it. Different materials age differently, which is why these numbers are most useful for deciding how closely to watch your line, not when to replace it.
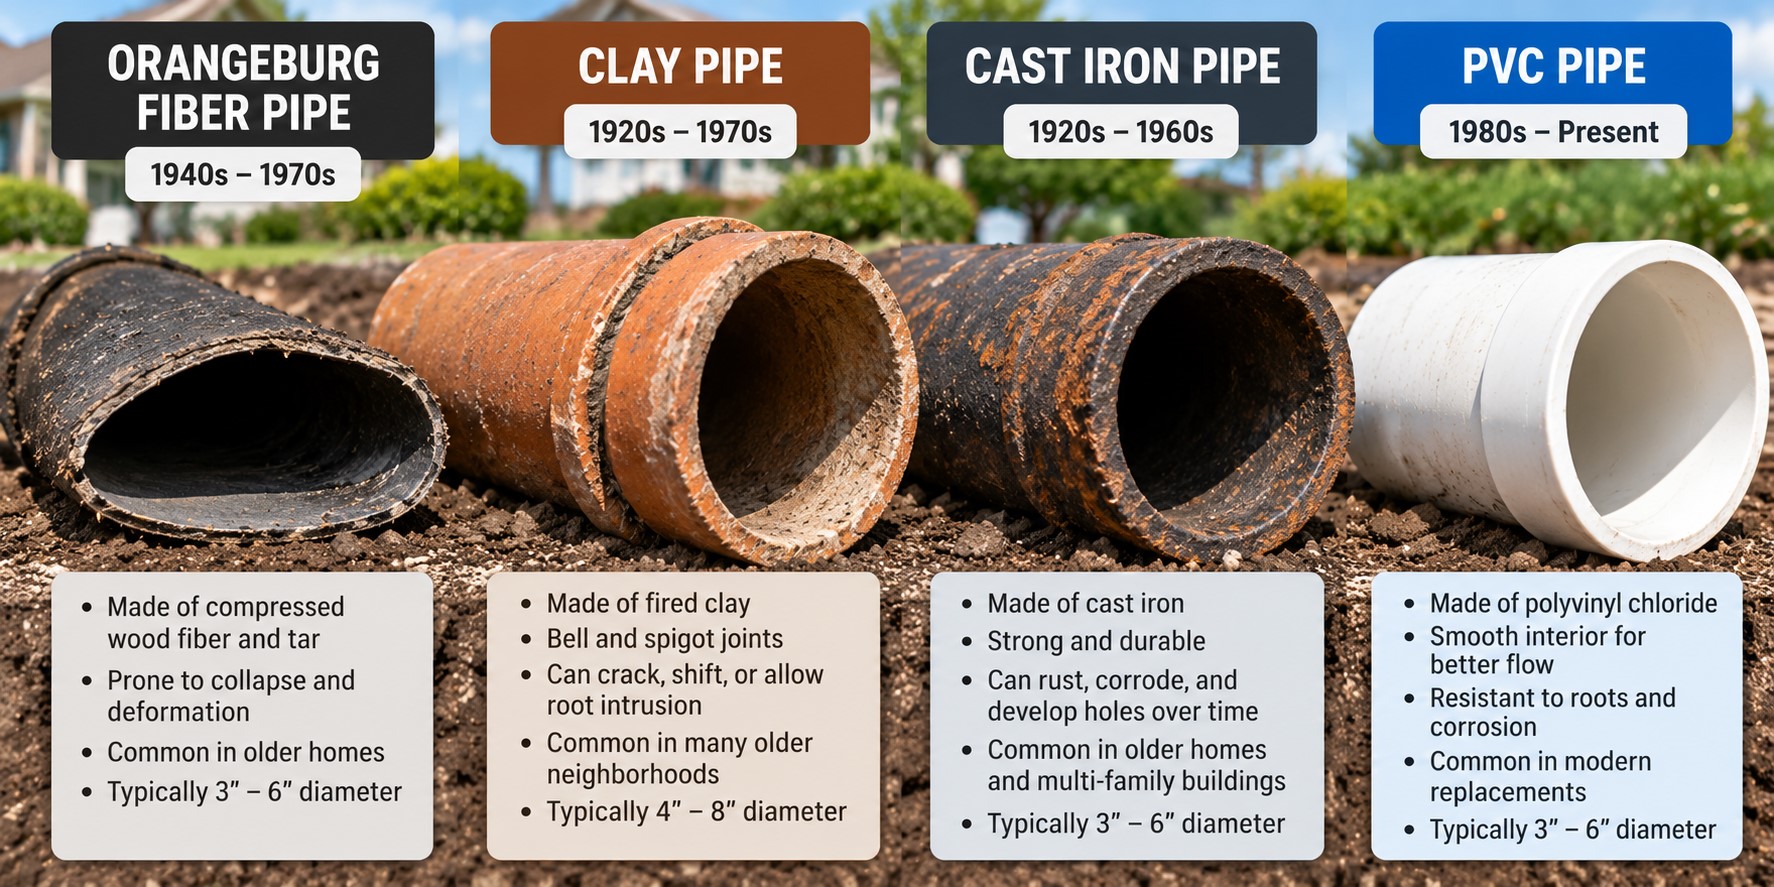
Orangeburg: Deserves Special Attention in Older Homes
Orangeburg pipe was made from layers of wood fiber bonded with coal-tar pitch, and it was used in many mid-20th-century homes because it was cheap and lightweight. Because it isn’t rigid, it can lose its shape as it deteriorates. After a camera inspection, you may hear terms like ovaling, blistering, delamination, or collapse. If an older home still has its original Orangeburg line, its condition deserves a close look.
Clay: Durable Pipe, Vulnerable Joints
Vitrified clay doesn’t corrode like metal, but older clay lines were built from short sections with many joints. Seattle Public Utilities notes that older clay and concrete side sewers without watertight joints are especially vulnerable to tree roots. Clay is also brittle, so soil movement or settling can crack it or shift the joints. The better question isn’t how old the clay is, but what condition the joints are in today.
Cast Iron: Corrosion Matters More Than Age
Cast iron is strong, but buried cast iron eventually corrodes. Internal scale can narrow the pipe and catch debris, and advanced corrosion can weaken the walls, cause cracks or holes, or wear away the bottom of the pipe. Two cast iron lines of the same age can be in very different shape depending on soil, moisture, and past repairs.
PVC and ABS: Long-Lasting, But Not Failure-Proof
Plastic sewer pipe is lightweight, smooth inside, and doesn’t rust. Angi notes PVC can last around 100 years. But a young plastic line can still have problems from poor bedding, improper slope, settling, construction damage, or offset joints, even when the material itself has plenty of life left.
How to Find Out What Your Sewer Line Is Made Of
- Home age: older homes are more likely to have clay, cast iron, or Orangeburg, while newer homes usually have PVC or ABS. But lines are often partly replaced over the years.
- Past records: check your home inspection report, seller disclosures, or permit records for sewer work.
- The cleanout: a visible sewer cleanout pipe near the house may show the material of at least that section.
- A camera inspection: the most reliable way to see the material and condition along the whole line.
What Can Shorten a Sewer Line’s Life?
- Tree roots: roots enter through cracks and joints and can grow into blockages. The EPA identifies root intrusion through sewer defects as a cause of backups.
- Soil movement: shifting ground can crack rigid pipe, separate joints, or create sags where debris collects.
- Poor installation: inadequate support, alignment, or slope can cause problems long before a pipe’s expected lifespan.
- Corrosion: cast iron loses capacity and strength as it corrodes.
- Heavy loads or construction: vehicles, digging, or landscaping work can damage buried pipe.
- Grease and wipes: the EPA lists fats, oils, grease, wipes, and other flushed items as common causes of blockages.
- Existing defects: small cracks, offsets, or sags can worsen over time.
Facing a Sewer Repair Decision?
Our free Before You Hire Home Repair Cost Checklist helps you compare sewer estimates, spot missing items like restoration and permits, and ask the right questions before you sign.
Warning Signs That Matter More Than the Pipe’s Age
- Recurring main-line clogs, especially ones that come back after cleaning
- Several fixtures draining slowly at the same time
- Gurgling toilets or drains when other fixtures are used
- Sewage backing up into a basement drain, tub, or shower
- Roots that keep returning after being cut
- Persistent sewer odors indoors or near the line
- Wet, unusually green, or sunken spots in the yard along the sewer route
- Known cracks, offsets, sags, or corrosion from a previous camera inspection
For a detailed walkthrough of these symptoms, see our guide to the signs of sewer line problems.
One Clog Doesn’t Mean the Line Is Worn Out
A structurally sound sewer line can still clog from grease, wipes, debris, or roots. Cleaning solves a blockage; repair or replacement addresses a defective pipe. If the line is completely blocked, a camera may not show much. Seattle Public Utilities notes that camera inspection is often most useful after the blockage is cleared, so the walls and joints can actually be seen.
When a Sewer Camera Inspection Is Worth It
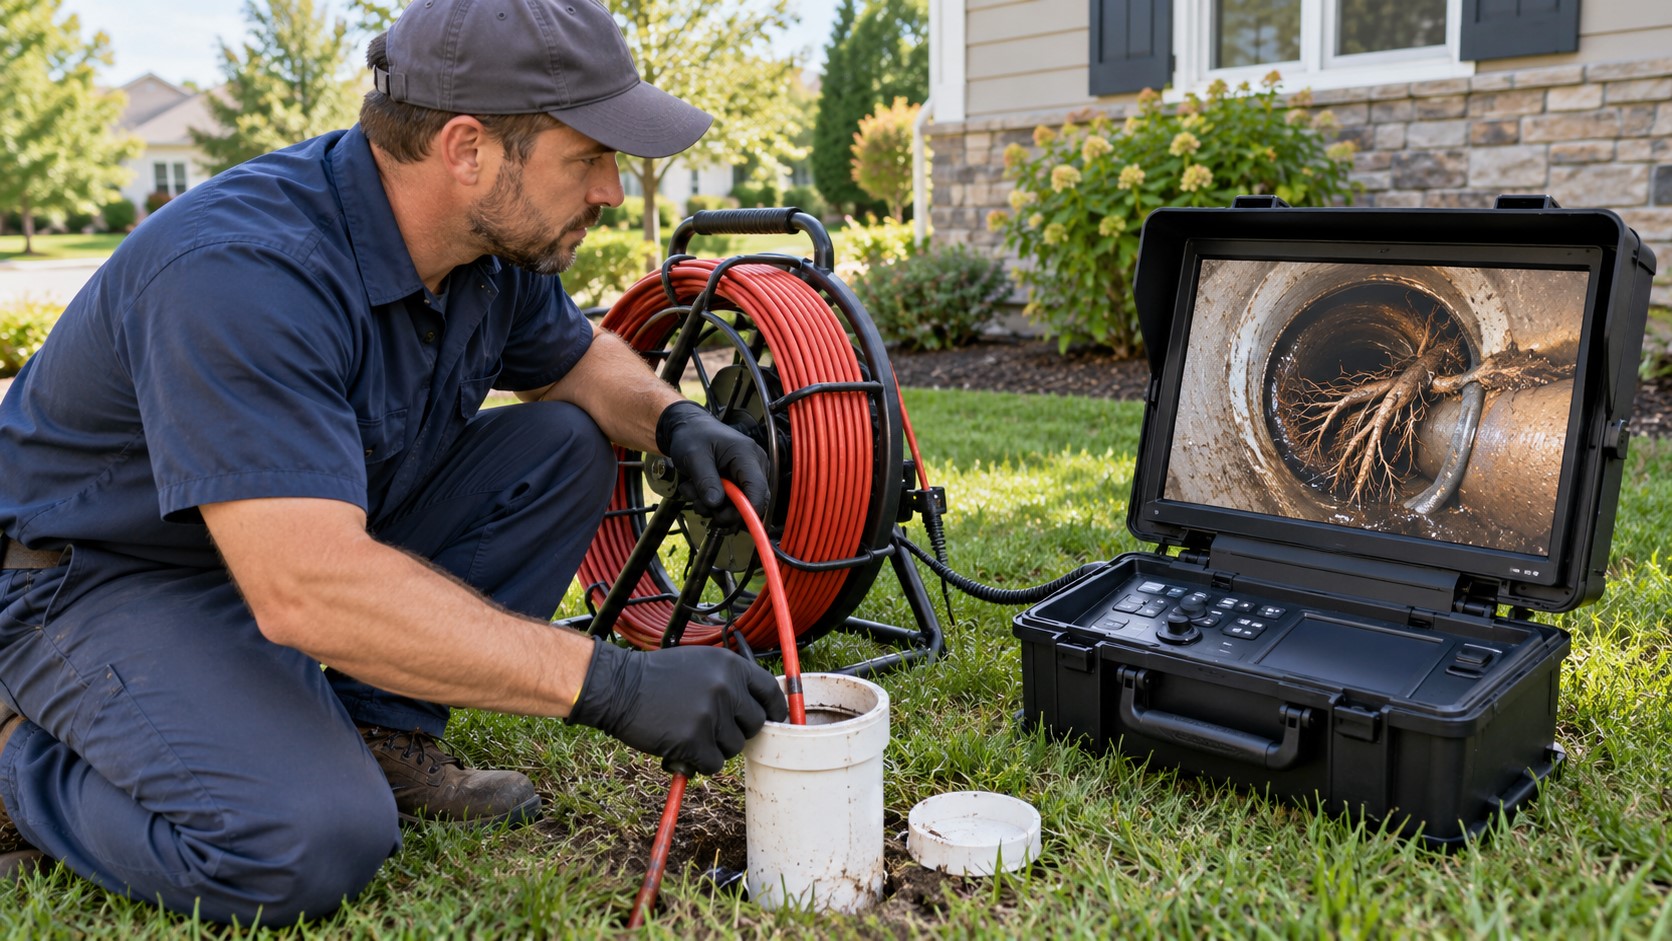
A camera inspection is especially useful when problems keep coming back, or when the age and material of an older line raise questions. A plumber or sewer inspector can run a camera through a cleanout to find cracks, roots, offsets, sags, corrosion, deformation, or collapse, and pinpoint where they are. Seattle Public Utilities also suggests getting a copy of the inspection video for your records. HomeGuide puts many sewer camera inspections at about $125 to $500.
What Camera Findings May Mean
| Finding | What It Often Points Toward |
|---|---|
| Minor roots or small cracks | Monitoring or maintenance, depending on severity |
| Moderate defects getting worse | Periodic re-inspection to track progress |
| Severe root intrusion | Cleaning may manage it, but the entry point may need repair |
| Severe cracks or fractures | Repair, as the line may be near structural failure |
| Major offsets or soil entering the pipe | Repair, since it can trap debris and erode soil |
| Large sags or “bellies” | Recurring blockages; often repair of that section |
| Collapse or major deformation | Reconstruction or replacement, not just cleaning |
General guidance only. A qualified professional should interpret your specific camera findings.
Does an Old Sewer Line Need Replacing Before It Fails?
Not automatically. Replacing a line just because it has reached a published age can mean replacing pipe that still works fine. On the other hand, ignoring an aging line with recurring backups and documented defects can lead to an emergency at the worst possible time.
A practical middle ground: use the pipe’s age and material to decide how closely to watch it, then use inspection findings and repair history to decide what to do. A decades-old Orangeburg line that’s deforming on camera is a very different situation from an equally old clay line with aligned joints and good flow.
Repair, Maintain, or Replace?
- Maintain when the pipe is structurally sound but roots or debris occasionally block flow.
- Repair a section when one area is damaged but the rest of the line is in good condition.
- Replace when defects are extensive, the pipe is collapsed or badly deformed, problems keep appearing in several sections, or spot repairs would just move the problem down the line.
If replacement is on the table, see our guides to sewer line replacement cost and trenchless sewer replacement.
Questions to Ask After a Sewer Camera Inspection
- What material is my sewer line, and has any section been replaced before?
- What defects did you find, and how far from the access point are they?
- Can I have a copy of the inspection video and still images?
- Is this a blockage, a maintenance issue, a structural defect, or a combination?
- Are roots entering through a specific crack or joint?
- Is the problem limited to one section or spread along the line?
- Would cleaning or a spot repair reasonably fix it?
- If you recommend replacement, what camera evidence supports it?
- Would trenchless repair or replacement work for this pipe?
- What could change the repair scope once work begins?
If sewage is backing up into your home: treat it as urgent. Raw sewage can contain
bacteria, viruses, and other contaminants, and the EPA warns that backups create health risks and property damage. Reduce
water use, avoid direct contact, and get professional help. If water is near electrical equipment, don’t enter the area
unless it’s safe.
How Long Do Sewer Lines Last? Frequently Asked Questions
How do I know how old my sewer line is?
Start with your home’s age and any records of sewer work. Lines are often partially replaced over time, so a camera inspection is the best way to see what material you actually have and what condition it’s in.
Should I replace my Orangeburg sewer line?
Orangeburg is the shortest-lived common sewer material, so if your home still has it, a camera inspection is a smart step. Replacement is often recommended when it shows deformation, blistering, or collapse.
How often should a sewer line be inspected?
There’s no set schedule for every home. A camera inspection is worth considering when you buy an older home, when problems keep returning, or when you know the line is an older material like Orangeburg or clay.
Does homeowners insurance cover an old sewer line?
Usually not for age-related wear or tree roots. Some insurers offer optional service line coverage. Check your policy.
The Bottom Line: How Long Do Sewer Lines Last?
A residential sewer line can serve for several decades or longer, but material and condition matter more than any universal replacement age. Orangeburg has the shortest typical lifespan at about 30 to 50 years. Clay and cast iron often serve for many decades but can develop joint, root, cracking, or corrosion problems. Modern PVC and ABS can potentially last 100 years or more when properly installed.
Use those numbers to ask better questions, not to schedule a replacement automatically. If an older line works normally and a camera shows no significant problems, age alone may not justify replacement. If backups keep recurring or an inspection shows serious defects, the pipe’s condition should drive the decision.
Get the Free Before You Hire Checklist
Download our free Before You Hire Home Repair Cost Checklist. Use it to compare sewer quotes and ask the right questions before you commit thousands of dollars.
Sources
- Seattle Public Utilities: Side Sewer Maintenance
- Seattle Public Utilities: Side Sewer Defects & Issues
- Seattle Public Utilities: Side Sewer Repair Methods
- U.S. EPA: Sanitary Sewer Overflow Frequent Questions
- Angi: A Homeowner’s Guide to Types of Sewer Pipes (2026)
- HomeGuide: Sewer Line Repair Cost
- HomeGuide: Sewer Camera Inspection Cost
House Care
Compass provides general educational information to help homeowners better understand repair and replacement decisions.
It does not diagnose specific problems. For advice about your specific home or project, consult an appropriately qualified
professional.
Repair or Replace Your Roof? Factors Homeowners Should Consider

Last updated: September 2026
When a roofer tells you there’s damage, the next question is often harder than the diagnosis: should you repair the roof or replace it? There’s no single age, dollar amount, or percentage that decides it for every house. The better approach is to weigh the roof’s age and condition, how much of it is affected, its repair history, the chance of hidden damage, and how a repair compares with a replacement that solves the bigger problem.
Quick Answer: Repair or Replace Your Roof?
- Repair usually makes sense when damage is localized, the roof is relatively young (GAF uses about 15 years as a guide for asphalt), matching materials are available, and the rest of the roof is sound.
- Replacement becomes more reasonable when damage is widespread, leaks keep coming back, shingles are brittle, curling, or bald across the roof, decking or structure is involved, or the roof is well into its service life.
- For scale: Angi’s 2026 data puts the average roof repair around $1,173 and the average full replacement around $9,600.
- Don’t decide on price alone. Compare what the repair actually fixes, how much roof life it preserves, and whether another major repair is close behind.
Repair vs. Replace at a Glance
| Factor | Points Toward Repair | Points Toward Replacement |
|---|---|---|
| Extent of damage | Small, localized area | Multiple slopes or large areas |
| Roof age | Relatively young for its material | Near or past expected lifespan |
| Repair history | Few or no past repairs | Repeated repairs in different spots |
| Shingle condition | Surrounding shingles healthy | Widespread curling, cracking, granule loss |
| Leaks | One isolated leak with a clear source | Several unrelated leaks |
| Decking / structure | Sound in accessible areas | Soft, rotted, or sagging decking |
| Matching | Compatible material available | Discontinued or badly weathered material |

Start With the Extent of the Damage
The most useful question is whether the problem is isolated or widespread. A few missing shingles, a localized flashing failure, or a small storm-damaged area may be repairable when the surrounding roof is in good shape. GAF’s homeowner guidance makes the same distinction: small, localized damage may be appropriate for repair, while significant or widespread problems are more likely to justify replacement.
Widespread curled, cracked, brittle, or worn shingles point to a different problem than one damaged section. In that case, patching one spot may stop today’s leak without changing the overall condition of the roof.
How Old Is the Roof?
The same defect means something different on a newer roof than on an older one. GAF’s guidance says that if an asphalt roof is under about 15 years old with smaller signs of damage, repairing it can be a smart choice because it still has life left. An older roof with broader deterioration is a stronger replacement candidate.
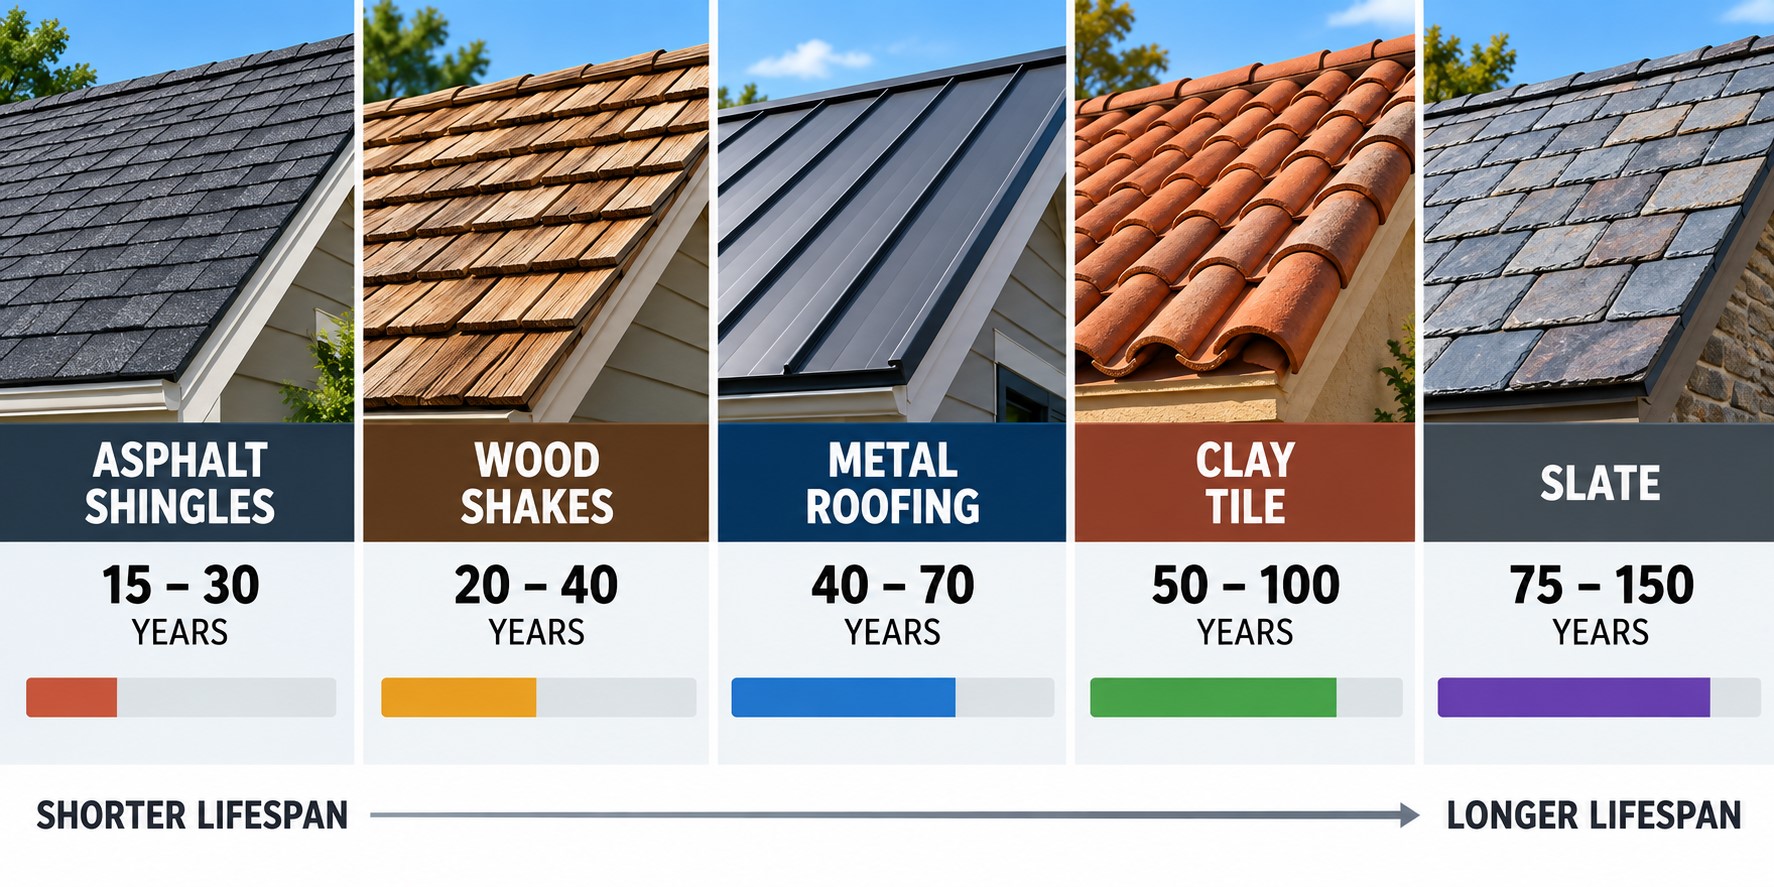
That’s a guideline, not an expiration date. Typical lifespans vary a lot by material:
| Roofing Material | Typical Lifespan |
|---|---|
| Asphalt shingles | 15 – 30 years |
| Wood shakes | 20 – 40 years |
| Metal | 40 – 70 years |
| Clay / concrete tile | 50 – 100 years |
| Natural slate | 75 – 150+ years |
Climate, installation quality, ventilation, maintenance, and storm exposure all affect how a particular roof ages. If you don’t know your roof’s age, check old invoices, permits, or seller disclosures, or ask a roofer whether the materials offer clues.
Has the Roof Needed Repeated Repairs?
One repair doesn’t make a roof a bad roof. Repeated repairs in different areas matter more. If you’ve already paid to fix several leaks, flashing failures, or storm-damaged sections, another repair deserves a bigger question: are you fixing isolated events, or paying again and again to extend a roof that’s failing in multiple places?
Ask the roofer for a list of known repair areas and whether the current problem is related to old work or is happening somewhere new.
What Kind of Damage Are You Dealing With?
- A few damaged shingles: often repairable if the surrounding roof is sound and matching shingles are available.
- Localized flashing problems: flashing around chimneys, skylights, walls, or vents can often be repaired without replacing the whole roof.
- One isolated leak: usually repairable once the true entry point is found. The ceiling stain isn’t always directly below it. (See our guide to roof leak repair.)
- Widespread shingle deterioration: broad curling, cracking, brittleness, or granule loss suggests roof-wide aging, not one defect.
- Multiple active leaks: leaks in several unrelated areas make spot repairs less attractive.
- Sagging or structural movement: can signal a more serious structural issue and deserves prompt professional evaluation.
- Decking deterioration: soft, rotted, or delaminated decking expands the job beyond the surface roofing.
- Large storm-damaged areas: when wind or hail affects several slopes, comparing against a replacement quote makes more sense than pricing one patch at a time.
Compare Repair Cost With Replacement Cost, the Right Way
National data shows how different the two price scales are. Angi reports an average roof repair of about $1,173, with many repairs between $395 and $1,967, and an average full replacement around $9,609. For more detail, see our guides to roof repair cost and roof replacement cost.
Those averages are only context. A $1,000 repair on a healthy roof may be an easy call. A $4,000 repair on an older roof with other worn areas is a different calculation. Compare your repair quote with an actual replacement estimate for your roof, using the material and scope you’d realistically choose, not a national average. And compare what each includes: a replacement estimate may cover tear-off, underlayment, flashing, ventilation, disposal, and permits that a spot repair doesn’t.
Rules of Thumb: Useful, But Not the Final Word
You’ll hear shortcuts like these, including from roofing manufacturers:
- The 25% rule: GAF suggests that if repairs will cost more than about 25% of a new roof, replacement may be the better value.
- The 30% rule: if damage covers more than about 30% of the roof, repair costs can start approaching replacement.
These are good conversation starters, but they shouldn’t decide for you. A pricey repair on a relatively young specialty roof may still make sense. A cheap repair on an old roof with widespread wear may not. The better question is how much useful roof life the repair will preserve, and whether the rest of the roof is healthy enough to justify it.
Getting Repair and Replacement Quotes?
Our free Before You Hire Home Repair Cost Checklist helps you compare estimates side by side, spot missing line items, and ask the right questions before you decide.
What Will the Repair Actually Accomplish?
Before approving a repair, ask the roofer what problem the work is expected to solve. A good localized repair addresses a specific defect and restores that area. It’s less convincing when the roofer expects nearby sections to fail soon, or describes the work as temporary.
Ask whether the repair is meant to be permanent for that area, whether the surrounding materials are still serviceable, and what other problems they can already see. That helps separate a worthwhile repair from a short-term patch that only delays a bigger project.
Other Factors That Can Tip the Decision
Can the Repair Match the Existing Roof?
If your shingles or tiles have been discontinued or have weathered a lot, a repaired section may not match. Beyond looks, the roofer needs to confirm that available materials are technically compatible with your existing roof. If matching matters to you, ask to see the proposed material before approving the work.
What’s Happening Under the Shingles?
When the attic is safely accessible, the underside of the roof deck may show moisture stains, wet insulation, decking damage, ventilation problems, or water tracks. That inspection has limits, though. Some decking damage stays hidden until roofing is removed. If an estimate assumes the decking is sound, ask how unexpected damaged decking would be priced.
Is There a Ventilation or Moisture Problem?
A roof can fail early when an underlying moisture or ventilation problem isn’t addressed. GAF recommends checking attics for moisture, mold, mildew, and ventilation issues when evaluating roof problems. If a roofer recommends new shingles but doesn’t mention an obvious attic moisture or ventilation issue, ask whether it could shorten the life of the new roof.
Is Storm Damage Involved?
If the damage came from a sudden event like hail, wind, or a fallen tree, your homeowners insurance may cover part of the repair or replacement, minus your deductible. Insurance typically doesn’t cover wear and tear. Document the damage and contact your insurer before permanent work begins.
Should You Repair Before Selling the House?
A planned sale adds another layer. A documented, localized repair may be enough when the roof is otherwise serviceable. An aging roof with visible wear can still become a negotiation point even after one leak is fixed.
A new roof can help at resale. According to the 2025 Cost vs. Value Report, an asphalt shingle roof replacement recouped roughly two-thirds of its cost on average. But don’t assume you’ll get the full cost back. Base the decision on the roof’s condition, your timing, and local market expectations.
Questions to Ask a Roofer Before Deciding
- What specific damage did you find, and is it localized or widespread?
- How old do you believe the roof is, and how does that affect your recommendation?
- What condition are the surrounding shingles or roofing materials in?
- Has this roof been repaired in multiple areas before?
- Will you check the attic or underside of the roof deck if it’s safely accessible?
- Do you see moisture staining, ventilation issues, or decking problems?
- What will this repair fix, and how long do you expect it to last?
- Is this a permanent repair or a temporary measure?
- If I repair this area, what other problems are likely to need attention soon?
- Can you give me separate written estimates for repair and replacement?
- If hidden decking damage is found, how will it be priced?
- What warranties apply to each option?
When a Second Opinion Is Worth It
A second opinion is worth considering when one roofer recommends a small repair and another recommends a full replacement, especially when the price gap is several thousand dollars. Ask each to show the evidence behind their recommendation: photos, affected areas, signs of wear, attic findings, and any visible decking or flashing problems. Two roofers may still disagree, because roofing decisions involve judgment. The goal is to understand the facts behind each recommendation.
Don’t let an active leak wait while you decide. Repair-or-replace decisions take time,
but water coming in can cause more damage while you compare options. Ask your roofer about temporary protection, such as
tarping, and don’t climb onto a wet or damaged roof yourself.
Repair or Replace: Frequently Asked Questions
How do I know if my roof needs to be replaced?
Common signs include widespread curling, cracking, or missing shingles, heavy granule loss, multiple leaks, sagging, and an asphalt roof that’s 20 years old or more. A qualified roofer can confirm whether the problem is roof-wide.
Is it cheaper to repair or replace a roof?
A repair is almost always cheaper upfront. Replacement can be the better value when repairs keep adding up or the roof is near the end of its life.
Can you replace just part of a roof?
Sometimes a single section or slope can be replaced, but matching, warranty, and how the new section ties into the old roof all matter. Ask your roofer to explain the pros and cons for your roof.
How long will a roof repair last?
A good repair on a healthy roof can last for years. On an aging roof, a repair may only hold until the next weak spot fails. Ask the roofer how long they expect the repaired area to remain serviceable.
The Bottom Line: Repair or Replace Your Roof?
Repair is usually easier to justify when the damage is small, the roof is relatively young, the surrounding materials are healthy, and the work solves a clearly defined problem. Replacement becomes more reasonable when wear is widespread, repairs keep repeating, the roof is aging, or a large repair would leave you with an expensive fix on an old roof.
Don’t let one rule, one age, or one percentage decide for you. Compare the condition of the whole roof, what each option accomplishes, the actual written costs, and how confident each option makes you that the roof will stay reliable. A good roofer should be able to explain why their recommendation fits your roof, not just that one option costs more.
Get the Free Before You Hire Checklist
Download our free Before You Hire Home Repair Cost Checklist. Use it to compare repair and replacement quotes and ask the right questions before you commit.
Sources
- GAF: How Do I Know if My Roof Needs to Be Replaced?
- GAF: Should You Repair or Replace Your Roof?
- GAF: How to Identify Roof Damage
- Angi: How Much Does Roof Repair Cost? (2026 Data)
- Angi: How Much Does Roof Replacement Cost? (2026 Data)
House Care
Compass provides general educational information to help homeowners better understand repair and replacement decisions.
It does not inspect or diagnose specific roofs. For advice about your specific home or project, consult an appropriately
qualified professional.
AC Repair Cost: Common Repairs and What You May Pay
Last updated: September 2026
When a central air conditioner stops cooling, the repair bill can range from a small service call to a major part replacement that costs thousands. The useful question isn’t just “What does AC repair cost?” It’s: what failed, what does the repair include, is the part under warranty, and does repairing still make sense given the system’s age and condition?
Quick Answer: How Much Does AC Repair Cost?
- Many common repairs: about $150 to $650, with a national average around $350 to $360 (HomeGuide and Angi).
- Larger or complex repairs: about $650 to $2,500+, especially refrigerant leaks, coils, or compressors.
- Diagnostic/service call: typically $75 to $200, sometimes credited toward the repair.
- Biggest cost drivers: the failed part, labor time, warranty status, refrigerant work, access, emergency timing, and whether several parts are involved.
- These are planning ranges, not quotes. A technician has to diagnose the actual problem first.
What Does AC Repair Usually Cost?
HomeGuide puts many central AC repairs at about $150 to $650, with a national average of about $360, while Angi’s 2026 data shows an average near $350. Major repairs can reach $2,500 or more. The spread is large because “AC repair” covers everything from clearing a clogged drain line to replacing a compressor.
A diagnostic or service call commonly costs about $75 to $200 before any repair work. Some companies credit that fee toward the repair if you approve it; others bill it separately. HomeGuide puts technician labor at about $75 to $150 per hour. Emergency, weekend, and peak-season calls often cost more.
Common AC Repairs and Typical Costs

| Repair | Typical Cost | What It Does |
|---|---|---|
| Condensate drain line cleaning | $75 – $250 | Clears clogs that cause water leaks or shut the system off |
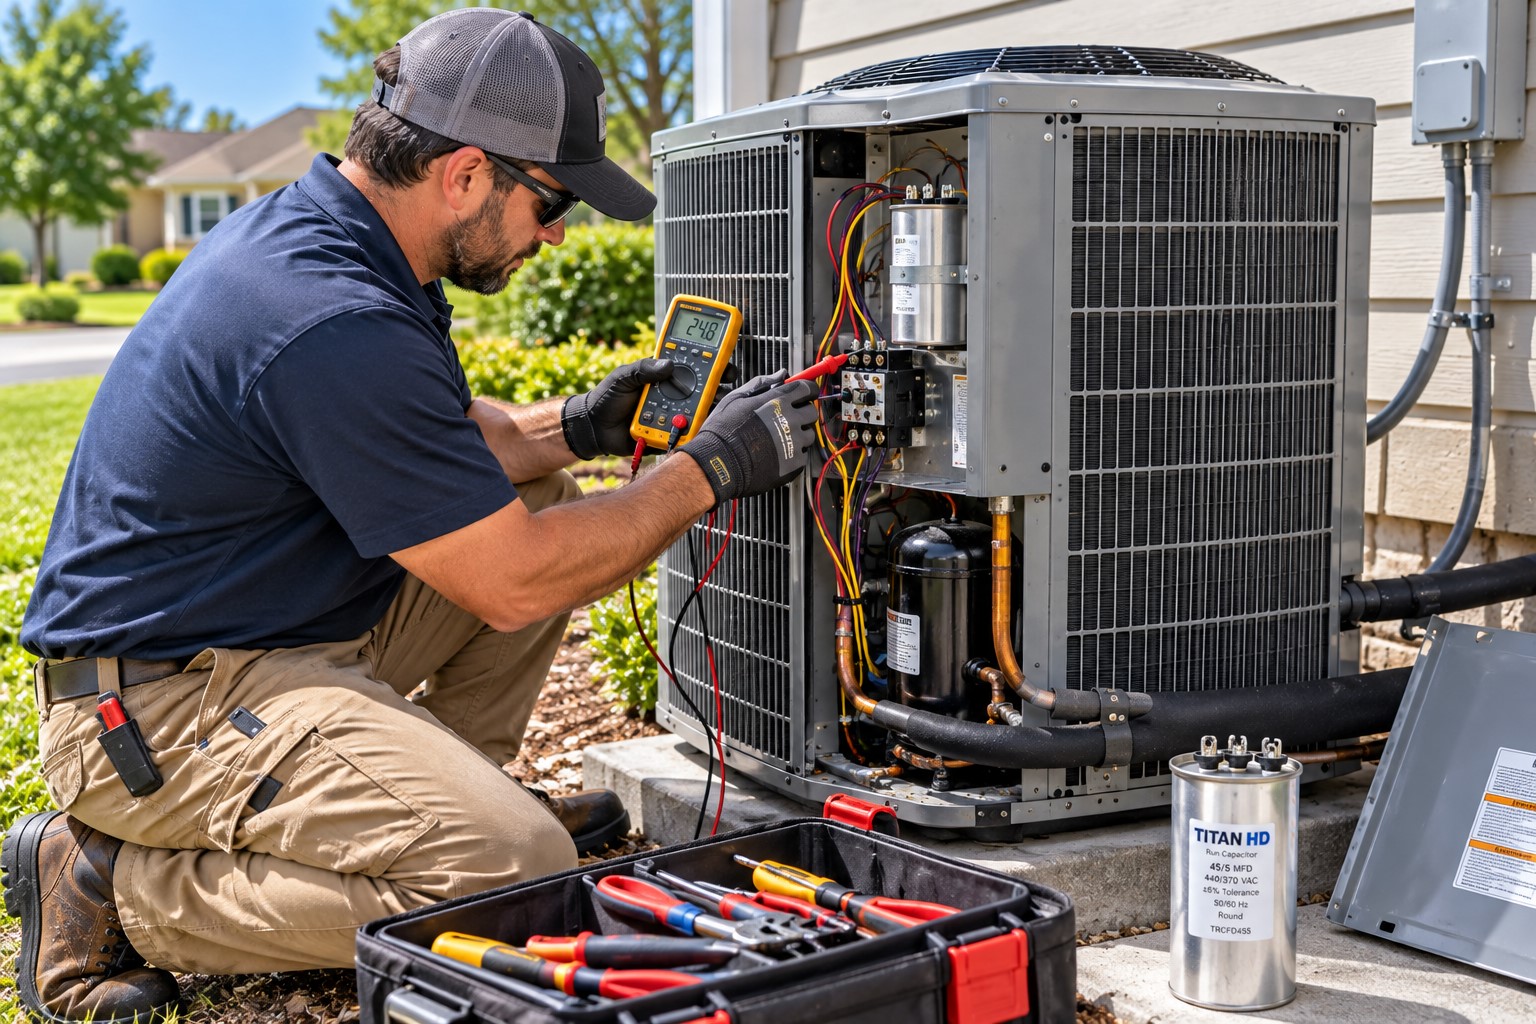
| Capacitor replacement | $100 – $250 | Helps motors start and run; a common cause of a humming outdoor unit |
| Refrigerant recharge | $100 – $600 | Restores refrigerant; should come with finding the leak |
| Thermostat replacement | $140 – $350 | A bad thermostat can mimic other AC problems |
| Control board replacement | $150 – $700 | Manages the system’s electrical functions |
| Contactor replacement | $200 – $450 | An electrical switch that lets the outdoor unit start |
| Condenser fan motor | $200 – $700 | Moves heat away from the outdoor unit |
| Refrigerant leak repair | $200 – $1,500 | Finds and fixes the source of lost refrigerant |
| Blower motor | $300 – $900+ | Moves cooled air through your ducts |
| Compressor replacement | $600 – $2,500+ | The heart of the system; one of the priciest repairs |
| Evaporator coil replacement | $1,000 – $4,500 | The indoor coil that absorbs heat from your home’s air |
Source: HomeGuide national cost data. Local prices vary. Compressor costs vary widely by guide and warranty status; out-of-warranty replacements often run about $1,800 to $2,800. See our AC compressor replacement cost guide for details.
Small electrical and drainage repairs usually land at the low end. Refrigerant leaks, blower motors, coils, and compressors push the bill much higher.
Quick, Safe Checks Before You Call
Some “AC problems” turn out to be simple settings or maintenance issues. Before scheduling a service call, it’s reasonable to check:
- Thermostat settings: set to “cool,” with the temperature below room temperature, and fresh batteries if it uses them.
- Air filter: a very dirty filter can restrict airflow and reduce cooling.
- Breaker: check whether the AC or furnace breaker has tripped. If it trips again after being reset once, leave it off and call a professional.
Safety note: Don’t open electrical panels on the AC unit or attempt refrigerant work
yourself. AC units carry high voltage, and refrigerant work requires EPA Section 608 certification.

Why One AC Repair Quote Can Be Much Higher Than Another
- The diagnosis is different. One technician may find a failed electrical part; another may find that the electrical failure was caused by a bigger motor or compressor problem.
- Warranty status. A manufacturer parts warranty can cut the cost of an expensive part, but labor, refrigerant, and diagnostic fees may still apply.
- Refrigerant work. Opening the sealed refrigerant system adds recovery, evacuation, leak testing, and recharging.
- Difficult access. Equipment in a tight attic, crawlspace, or rooftop takes more labor.
- Emergency timing. After-hours, weekend, holiday, and peak-season service often costs more.
- More than one repair. Ask whether each item is needed to restore cooling or is an optional recommendation.
Comparing AC Repair Quotes?
Our free Before You Hire Home Repair Cost Checklist helps you line up estimates side by side, spot missing line items, and ask the right questions before you approve a repair.
A Low Refrigerant Charge Isn’t Normal Maintenance
Homeowners are sometimes told the AC “just needs a little refrigerant.” That may restore cooling temporarily, but a central AC is a sealed system, and refrigerant doesn’t normally get used up. If the charge is low, there’s usually a leak.
Ask whether the technician found the leak, how it was diagnosed, and whether the quote includes repairing it rather than just adding refrigerant. Repeatedly recharging without fixing the cause can turn a smaller problem into an ongoing expense.
For existing R-410A systems, current EPA rules still allow you to maintain and repair your equipment throughout its useful life, including replacing major parts like a compressor, condensing unit, or indoor coil. The industry’s refrigerant transition doesn’t automatically mean your system has to be replaced. Older systems using R-22, however, can be expensive to recharge because that refrigerant is no longer produced in the U.S.
Does a Failed Part Mean You Need a New AC?
Not necessarily. A failed capacitor, contactor, thermostat, drain part, fan motor, or control board can be a reasonable repair on an otherwise dependable system. The decision gets harder when the repair involves a compressor, evaporator coil, repeated refrigerant leaks, or several major parts on an older system.
ENERGY STAR suggests considering replacement when an air conditioner is more than about 10 years old, especially if it needs frequent repairs, energy bills are rising, or comfort has declined. That doesn’t mean every 10-year-old AC should be replaced. It’s a reason to compare the repair cost with the system’s age, condition, efficiency, repair history, warranty status, and likely remaining life.
For comparison, many standard-to-midrange central AC replacements run about $5,000 to $12,500. See our guides to AC replacement cost and AC condenser replacement cost for full breakdowns.
Questions to Ask Before Approving an AC Repair
- What exactly failed, and how did you confirm it?
- Which part or parts are being replaced?
- Is the failed part covered by a manufacturer warranty?
- Does the estimate include labor, refrigerant, diagnostic fees, and materials?
- If the system is low on refrigerant, where is the leak, and is fixing it included?
- Will this restore normal operation, or are there other known problems?
- Are any items optional upgrades rather than required repairs?
- What warranty covers the repair labor and the new part?
- Given my system’s age and condition, would you repair it or compare replacement? Why?
- Could anything change the final price once the repair begins?
When a Second Opinion Is Worth It
- The repair estimate is in the high hundreds or thousands of dollars.
- You were told the compressor or evaporator coil has failed.
- The first recommendation jumps straight from a repair diagnosis to whole-system replacement.
- Two technicians gave you very different explanations for the same symptoms.
- The AC has had repeated major repairs in a short time.
- You’re being asked to replace several parts without a clear reason for each.
When comparing estimates, make sure both contractors are diagnosing the same failure and proposing the same repair. For major repairs, ask for the specific part or model being installed and whether it’s covered by a parts warranty. A lower quote isn’t automatically better if it doesn’t fix the cause.
AC Repair Cost: Frequently Asked Questions
What is the most common AC repair?
Capacitor replacements, clogged drain lines, and thermostat problems are among the most common, and they’re usually at the lower end of the cost range.
Is it worth repairing a 15-year-old AC?
It depends on the repair. A small, inexpensive fix may still make sense. A major repair like a compressor or coil on a 15-year-old system is worth comparing against a replacement quote, especially if it uses R-22 refrigerant.
Why is my AC running but not cooling?
Common causes include a dirty air filter, low refrigerant from a leak, a failed capacitor or fan motor, a frozen evaporator coil, or a compressor problem. A technician can diagnose the actual cause.
Does a home warranty cover AC repair?
Many home warranty plans cover some AC repairs, but coverage limits, exclusions, and service fees vary widely. Read your contract carefully and ask what’s covered before scheduling service.
The Bottom Line on AC Repair Cost
For planning, many central AC repairs cost about $150 to $650, while larger or more complex repairs can run $650 to $2,500 or more. Small electrical and drainage repairs usually land at the low end; refrigerant leaks, blower motors, coils, and compressors push the bill higher.
Before approving a large repair, make sure you understand what failed, whether the part is under warranty, what the estimate includes, and whether the repair makes financial sense for your system’s age and condition. The goal isn’t to pick the cheapest number. It’s to understand what you’re paying to fix and what that repair will accomplish.
Get the Free Before You Hire Checklist
Download our free Before You Hire Home Repair Cost Checklist. Use it to compare HVAC quotes, catch missing line items, and decide with confidence.
Sources
- HomeGuide: AC Repair Cost
- HomeGuide: HVAC Repair, Service, and Maintenance Cost
- HomeGuide: AC Refrigerant Leak Repair Cost
- Angi: HVAC Repair Cost (2026 Data)
- ENERGY STAR: When Is It Time to Replace?
- U.S. EPA: Frequent Questions on the Phasedown of HFCs
House Care
Compass provides general educational information to help homeowners better understand repair and replacement decisions.
Cost figures are national planning estimates and will vary by location, home, and contractor. For advice about your
specific home or project, consult an appropriately qualified professional.
Hail Damage Roof Repair: Signs, Costs, and Next Steps

Last updated: September 2026
Hail can damage a roof in ways that are obvious from the ground, but it can also leave smaller impact damage that’s hard to spot right away. After a hailstorm, the goal isn’t to climb onto the roof and hunt for every mark yourself. It’s to look for safe, visible clues, document what happened, protect the inside of your home if water is getting in, and get a professional evaluation if damage is suspected.
Quick Answer: Hail Damage on Your Roof
- Wait until it’s safe, then check from the ground: dented gutters, vents, siding, and AC units are common clues.
- Document everything with photos and note the date and time of the storm.
- Don’t climb on the roof. Protect the interior if water is coming in.
- Get a roof inspection and review your homeowners policy before filing a claim.
Typical cost: This Old House puts the average hail repair around $940 ($4 to $7 per sq. ft.), while Angi’s 2026 data shows most projects between $375 and $7,500. Widespread damage can mean a full roof replacement.
How Much Does Hail Damage Roof Repair Cost?
National cost guides show a very wide range because hail damage can mean anything from a few bruised shingles to a roof-wide problem:
- This Old House (2026): average repair around $940, or about $4 to $7 per square foot.
- Angi (2026): average around $4,250, with most homeowners paying $375 to $7,500 and an overall range of roughly $150 to $12,500.
Why such different averages? Each guide draws on different projects. Some average in lots of small shingle repairs, while others include larger jobs that replace whole roof sections. The takeaway: a small, localized repair may cost a few hundred dollars, while widespread damage can run into the thousands or lead to a full replacement.
Other Costs That Often Come With Hail Damage
Hail rarely damages only shingles. This Old House’s 2026 data gives these ranges for related repairs:
| Related Repair | Typical Cost |
|---|---|
| Flashing repair | $150 – $1,000 |
| Gutter repair | $193 – $620 |
| Interior water damage repair | $400 – $1,700 |
| Professional roof inspection | About $220 on average |
| Full roof replacement (if needed) | About $10,000 on average |
Source: This Old House 2026 hail damage cost guide. Local prices vary.
For a broader look at repair pricing, see our guides to roof repair cost and roof replacement cost.
What Hail Damage Can Look Like on a Roof
Hail doesn’t always leave a neat pattern of obvious holes. GAF notes that hail damage may appear as random dents or depressions, and that it isn’t always obvious right away. That’s why a roof can look fine from the yard even when a closer inspection finds damage.
- Granule loss: hail can knock the protective granules off asphalt shingles, leaving darker spots.
- Bruising or dents: a shingle may show a soft-looking bruise or depression rather than a clean crack.
- Cracked shingles: larger or harder hail can split shingles, especially on older, brittle roofs.
- Dented metal: dents in vents, flashing, gutters, or downspouts are evidence your home was hit.
- Damaged skylights: cracked or dented skylight parts often accompany roof damage.
- Interior water stains: if the roof was compromised, water may show up as stains, damp insulation, or leaks.

Hail Size Matters, But It’s Not the Only Factor
The National Weather Service classifies hail 1 inch in diameter (about quarter-size) or larger as severe-thunderstorm hail, and its damage-assessment guidance notes that shingle damage becomes more likely as hail size increases, particularly above about 1 inch. But roof age, material, hail hardness, wind speed, impact angle, storm length, and existing wear all matter too. A storm report can show hail hit your area, but only an inspection can tell whether your roof was damaged.
Signs You Can Check Safely From the Ground

You don’t need to climb onto the roof to gather useful information. Once conditions are safe, walk around the property and look for:
- Dents in gutters, downspouts, and metal roof vents
- Dents or chips on siding, fascia, or window trim
- Damage to your outdoor AC unit
- Broken or cracked skylights
- Roofing debris or loose granules on the ground or collected in gutters
- Missing, cracked, or displaced shingles visible from the ground (binoculars help)
- Water stains or dripping inside the home
GAF recommends documenting hail size when possible, photographing visible damage, checking the attic and exterior, and using binoculars from the ground rather than climbing onto a roof after a storm.
Stay off the roof. After a storm, a roof may be wet, slick, damaged, or covered with
loose granules and debris. Use ground-level observations, photos, and binoculars, and leave rooftop inspection to someone
with the training and equipment to work safely at height.
Why Hail Damage Is Sometimes Easy to Miss
Not every damaging impact causes an immediate leak. Hail can knock off granules or crack the shingle surface without creating an opening that day. GAF’s technical guidance notes that hail damage may show up later as granule loss and premature aging. So the lack of an active leak doesn’t prove your roof came through unharmed.
What to Do After a Hailstorm
1. Wait Until It’s Safe
Don’t go outside while lightning, high winds, or hail are still present.
2. Photograph Everything You Can See
Take pictures of any remaining hailstones (with a coin or ruler for scale), dents in metal, damaged siding, broken skylights, interior stains, and any roof damage visible from the ground.
3. Note the Date and Time
Storm timing helps when reviewing local weather reports or talking with a contractor or insurer.
4. Protect the Interior
If water is coming in, move belongings away from the leak and catch drips. Our guide to roof leak repair covers what to do first.
5. Schedule a Roof Inspection
If you see signs of impact or the storm produced substantial hail, have a qualified roofer take a closer look. See our guide to roof inspection cost for what to expect.
6. Review Your Insurance Policy
Coverage, deductibles, deadlines, exclusions, and documentation requirements vary. Your insurer can explain your specific coverage.
Getting Hail Damage Repair Quotes?
Our free Before You Hire Home Repair Cost Checklist helps you compare roofing estimates, spot missing line items, and ask the right questions before you sign.
What a Roofer May Inspect After Hail
A hail-damage inspection may cover the shingles, flashing, vents, skylights, gutters, ridge caps, and other exterior parts that show impact damage. If the attic is safely accessible, it can also be worth checking for moisture stains, wet insulation, or signs of an active leak. An attic check won’t reveal all hidden damage, though. Some decking damage only shows up once roofing is removed.
Repair a Few Areas or Replace the Roof?
Hail damage doesn’t automatically mean you need a new roof. Localized damage may be repairable if the rest of the roof is in good shape and matching materials are available. Replacement becomes more likely when impact damage is widespread across several slopes, the roof is already near the end of its life, or a repair would leave a patchwork that doesn’t address the overall condition.
Base the decision on the extent of actual damage, the roof’s age and condition, material availability, and the scope of work, not just the fact that hail fell. Our guide on whether to repair or replace your roof walks through the factors in more detail.
What Can Make Hail Damage Repair Cost More?
- Amount of damage: a few shingles cost far less than impact damage across several roof slopes.
- Roofing material: asphalt, metal, tile, slate, and wood each have different repair methods and costs.
- Pitch and access: steep, tall, or complex roofs need more labor and safety equipment.
- Flashing and openings: damage around chimneys, skylights, vents, and valleys adds work.
- Decking damage: discovered once shingles are removed.
- Interior water damage: drywall, insulation, or ceilings may need separate repair.
- Gutters and exterior parts: siding, skylights, screens, and metal components may also need work.
How Insurance May Fit In
Homeowners insurance often covers sudden hail damage, but coverage is policy-specific. Deductibles (including separate wind/hail deductibles in some areas), exclusions, roof-age provisions, cosmetic-damage limits, settlement methods, and claim deadlines all vary.
State Farm advises policyholders who believe hail damaged their roof to document the damage and report a claim promptly when appropriate, and notes that the homeowner chooses the contractor. A roofer can estimate the work, but your insurance company decides what’s covered under your policy. Review your policy and ask your insurer how your deductible applies before assuming a repair or replacement will be paid for.
Questions to Ask a Roofer About Hail Damage
- What specific hail damage did you find? Can you show me photos?
- Is the damage localized or spread across several roof slopes?
- Which marks are hail damage, and which are normal wear, aging, or blistering?
- Can the damaged areas be repaired, or are you recommending replacement? Why?
- Will you check the attic or underside of the roof deck if it’s safely accessible?
- Do you see signs of leaks, moisture, ventilation problems, or decking damage?
- If hidden decking damage is found, how will it be priced?
- Does the estimate include flashing, vents, ridge caps, gutters, disposal, and cleanup?
- What workmanship and material warranties apply?
Be Careful With Storm-Chasing Pressure
Large hailstorms often bring a wave of contractors into an area. That doesn’t make every out-of-town contractor unreliable, or every local one the right choice. Verify licensing or registration where required, insurance, business identity, references, warranty terms, and the exact scope of work before signing.
Be cautious of anyone who pressures you to sign immediately to lock in a “special price,” insists every mark requires a new roof, or asks you to sign over your insurance claim before work begins. A clear inspection, photos, a written scope, and an understandable estimate are worth more than pressure.
Hail Damage Roof Repair: Frequently Asked Questions
What size hail damages a roof?
The National Weather Service considers hail 1 inch or larger (about quarter-size) severe, and damage becomes more likely above that size. Smaller hail can still cause damage to older or already-worn roofs, especially with strong wind.
Can hail damage cause a leak months later?
Yes. Hail can crack shingles or knock off granules without causing an immediate leak, and damaged areas may weather faster over time. That’s one reason a post-storm inspection can be worthwhile even if nothing is leaking yet.
Does homeowners insurance cover hail damage to a roof?
Often, yes, since hail is a sudden event. But deductibles, roof-age rules, cosmetic-damage limits, and claim deadlines vary by policy. Check your policy and talk with your insurer.
How long do I have to file a hail damage claim?
It depends on your policy and state. Some policies set specific deadlines, so check yours and report damage promptly.
The Bottom Line on Hail Damage Roof Repair
Hail damage can range from a few bruised shingles to widespread damage that calls for major repair or replacement. National guides put an average repair anywhere from about $940 (This Old House) to $4,250 (Angi), with totals from a few hundred dollars to many thousands depending on the extent of damage.
After a storm, document what you can safely see, stay off the roof, protect the interior from leaks, and have suspected damage evaluated before deciding whether you need a small repair or something bigger. The most useful estimate shows what was damaged, what will be repaired or replaced, and what could change the price once work begins.
Get the Free Before You Hire Checklist
Download our free Before You Hire Home Repair Cost Checklist. Use it to compare storm repair quotes and avoid pressure tactics and costly surprises.
Sources
- This Old House: Hail Damage Roof Repair Cost (2026)
- Angi: Hail Damage Roof Repair Cost (2026 Data)
- GAF: Roof Damage from Hail? Here’s What to Do Next
- GAF: Understanding Roof Storm Damage
- National Weather Service: Severe Thunderstorm Safety
- National Weather Service: Local Damage Assessment
- State Farm: Roof Claims
House Care
Compass provides general educational information to help homeowners better understand repair and replacement decisions.
It does not inspect or diagnose specific roofs and does not provide insurance advice. For advice about your specific home,
project, or policy, consult an appropriately qualified professional or your insurer.
Trenchless Sewer Line Replacement Cost: Is No-Dig Replacement Worth It?
Last updated: September 2026
Trenchless sewer work can sound like the obvious choice: fix or replace the buried sewer line without digging a long trench through your yard, driveway, patio, or landscaping. Often, that reduced surface damage is the main advantage. But trenchless isn’t always the cheapest option, and not every damaged sewer line is a good candidate. This guide explains the costs, the two main methods, and how to tell whether trenchless makes sense for your home.
Quick Answer: How Much Does Trenchless Sewer Line Replacement Cost?
- Typical planning range: about $60 to $250 per linear foot, depending on the method and project.
- Pipe bursting: roughly $60 to $200 per foot. Pipe lining (CIPP): roughly $90 to $250 per foot (HomeGuide).
- Typical project total: about $1,900 to $6,000, averaging around $2,900 (Angi, 2026).
- Biggest cost drivers: pipe length and diameter, depth, access, pipe condition, roots or obstructions, permits, access pits, and restoration.
- Trenchless can reduce yard and driveway damage, but it isn’t automatically cheaper. A camera inspection and written estimate are still needed.
What Does “Trenchless” Actually Mean?
Trenchless is a broad term for sewer repair or replacement methods that avoid digging up the entire length of the pipe. The two most common residential methods are very different:
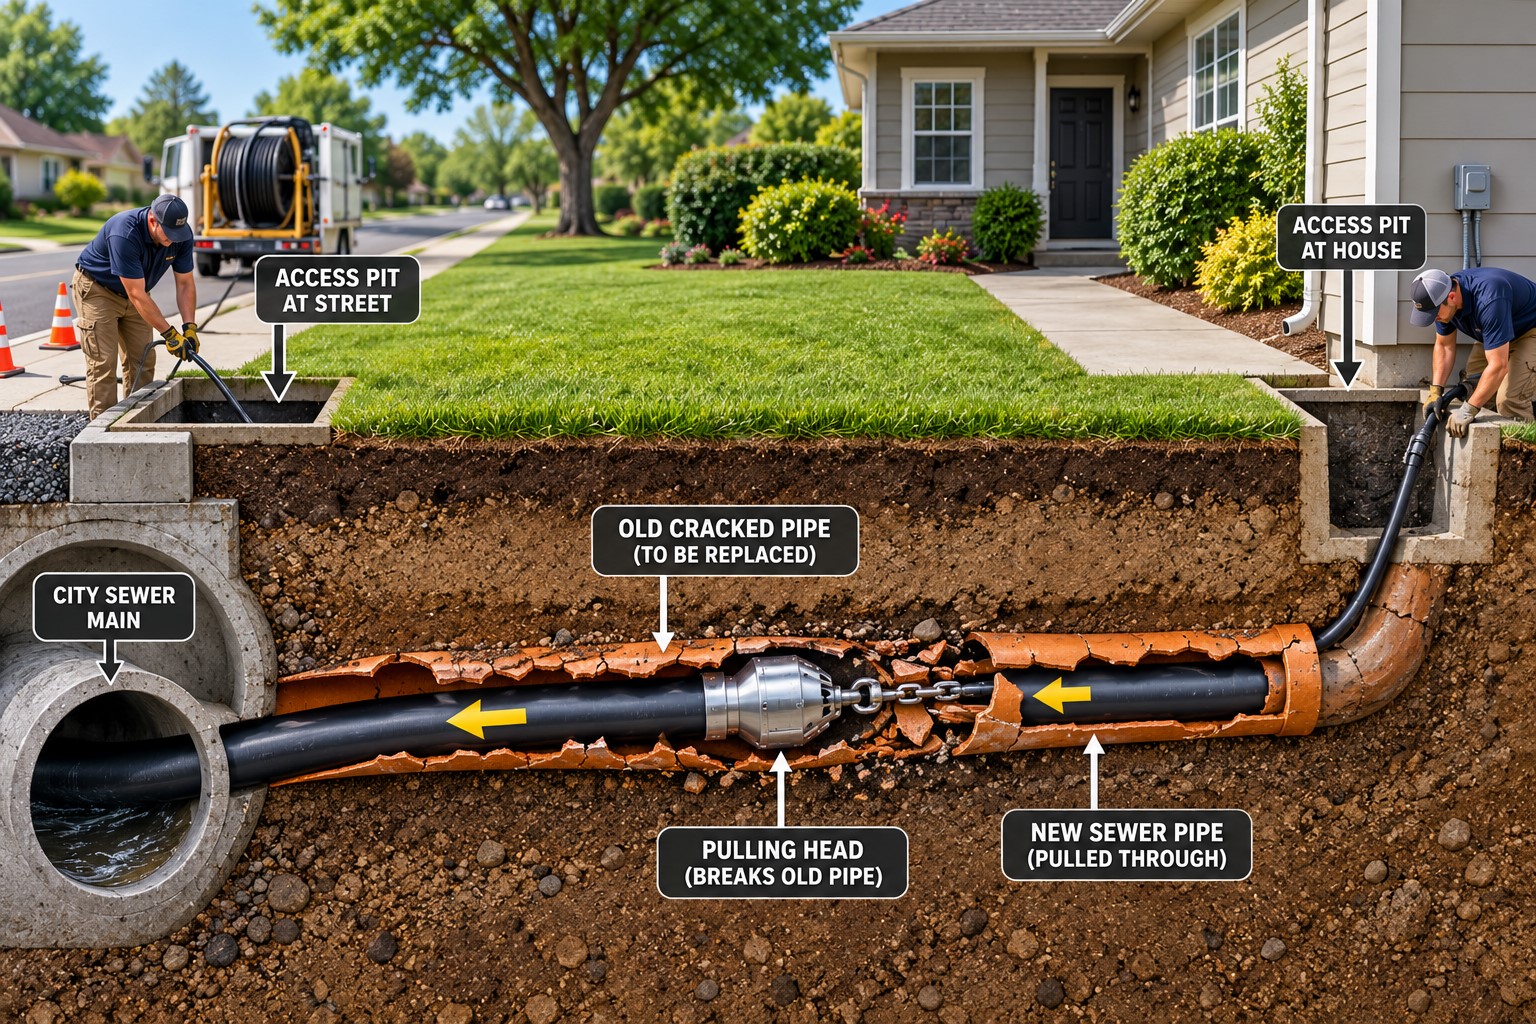
- Pipe bursting breaks apart the old pipe while pulling a new pipe into roughly the same path. It’s a true replacement.
- Cured-in-place pipe (CIPP) lining inserts a resin-soaked liner into the existing pipe and cures it in place, creating a new pipe inside the old one. It’s a rehabilitation of the existing line. ASTM maintains an industry standard (F2561) for one form of this kind of sewer lateral lining.
Contractors and cost guides sometimes lump both under “trenchless,” so make sure any estimate says exactly which method is being proposed.
How Much Does Trenchless Sewer Line Replacement Cost?
National cost guides show a wide range because trenchless projects vary a lot. HomeGuide places pipe bursting at about $60 to $200 per linear foot and CIPP lining at about $90 to $250 per linear foot. Angi’s 2026 data puts many projects at about $1,900 to $6,000, averaging around $2,900, and lists typical per-foot prices of about $135 to $150 for lining and $150 to $190 for bursting.
Trenchless Sewer Cost by Line Length
| Sewer Line Length | Estimated Cost Range |
|---|---|
| 25 – 35 feet | $1,500 – $8,750 |
| 35 – 45 feet | $2,100 – $11,250 |
| 45 – 55 feet | $2,700 – $13,750 |
| 55 – 75 feet | $3,300 – $18,750 |
| 75 – 100 feet | $4,500 – $25,000 |
Source: Angi 2026 national cost data. Permits, camera inspection, and restoration may be extra.
These are planning ranges, not quotes. A short, accessible line with easy entry points is a very different project from a deep line running under a driveway or mature landscaping.
Trenchless vs. Traditional Excavation at a Glance
| Factor | Trenchless | Traditional Open Trench |
|---|---|---|
| Digging | Small access pits | Trench along the full pipe route |
| Price per foot | Often higher | Can be lower for the pipe work itself |
| Restoration | Usually minimal | Can be major under driveways, patios, or landscaping |
| Best for | Lines under hardscape or landscaping; pipe suitable for lining or bursting | Collapsed or badly misaligned pipe; open, easy-to-dig areas |
| Fixes slope/sag problems? | Often limited | Yes, with direct access to regrade |
Why Trenchless Can Cost More per Foot but Less Overall
Traditional excavation may have a lower price for the pipe work in some cases, but the trench is only part of the bill. If a conventional replacement means tearing out and rebuilding a driveway, patio, walkway, retaining wall, or mature landscaping, restoration can add significantly to the final cost. Trenchless work may reduce those secondary costs because only limited access points are needed.
That’s why the best comparison isn’t price per foot. Compare the entire project: excavation, pipe work, permits, cleanup, and restoration.
Pipe Bursting: Cost and When It Makes Sense
With pipe bursting, a bursting head is pulled through the old pipe, fracturing it as it goes and pulling new pipe in behind it. National data commonly puts it at about $60 to $200 per linear foot. It can work well when the old line is badly deteriorated or cracked, too damaged for lining, but the general path of the existing sewer can still be used.

Pipe Lining (CIPP): Cost and When It Makes Sense
With CIPP lining, the contractor inserts a flexible, resin-coated liner into the old pipe, expands it against the pipe walls, and cures it into a new pipe-like structure. National guides commonly put it at about $90 to $250 per linear foot. Angi notes that sewer pipe liners are rated to last up to about 50 years.
Lining avoids removing the old pipe, but it depends on the existing pipe being suitable. A severely collapsed, badly deformed, or inaccessible line may need a different approach.

What Makes Trenchless Sewer Work More Expensive?
- Length: longer runs need more pipe or liner, labor, and equipment time.
- Pipe diameter: larger pipe can need more material and specialized equipment.
- Depth: deep lines make access pits, safety measures, and connections harder.
- Access: a usable cleanout and good entry and exit points simplify the job.
- Pipe condition: heavy roots, deformation, collapse, or offsets may need cleaning, prep, or a different method.
- Camera inspection: usually needed to confirm the method (see below).
- Permits and inspections: Angi notes permits can run up to about $1,000 depending on local requirements.
- Connections: tying into the house and the public sewer can add complexity.
- Surface restoration: trenchless reduces digging but doesn’t always eliminate it.
Comparing Trenchless and Traditional Quotes?
Our free Before You Hire Home Repair Cost Checklist helps you line up estimates side by side, spot missing items like restoration and permits, and ask the right questions before you sign.
When Trenchless May Be Worth It
- The sewer line runs under a driveway, patio, walkway, or mature landscaping.
- The damaged line is long enough that trenching would substantially disturb the property.
- A camera inspection shows the pipe is suitable for bursting or lining.
- You want to reduce digging, cleanup, and restoration.
- The total trenchless quote is competitive once traditional restoration costs are included.
When Traditional Excavation May Be the Better Option
Trenchless isn’t a universal solution. Traditional excavation may be more practical when the line has a major collapse, severe alignment or sagging problems, difficult connections, or when direct access is needed to correct the pipe’s slope. It can also make sense when the pipe runs under open lawn where restoration is inexpensive. A method that avoids digging but doesn’t fix the actual problem isn’t a bargain.
Get a Camera Inspection Before Choosing a Method
Before choosing pipe bursting, lining, or excavation, the contractor needs to know what’s happening inside the line. A sewer camera can reveal cracks, roots, offsets, deformation, blockages, or collapse, and help locate the damage.
HomeGuide puts many sewer camera inspections at about $125 to $500 with cleanout access, and about $175 to $750 without one. A camera doesn’t guarantee one method is right, but it gives you far better evidence than choosing based on symptoms alone. If you’re still figuring out whether you have a sewer problem at all, see our guide to the signs of sewer line problems.
Questions to Ask Before Approving a Trenchless Estimate
- What did the camera inspection show? Can I see the footage?
- Are you proposing pipe bursting, CIPP lining, or another method?
- Is this a true pipe replacement or a rehabilitation of my existing pipe?
- Why is this method right for the condition of my line?
- What length and diameter of pipe are included?
- How many access pits or dig areas will be needed?
- Are permits, inspections, camera work, cleaning, and final testing included?
- What surface restoration is included, and what’s excluded?
- How will connections at the house and public sewer be handled?
- Will this method reduce the inside diameter of the pipe?
- What happens if the pipe is in worse shape than expected?
- What warranty covers the pipe or liner and the labor?
How to Compare Trenchless and Traditional Estimates
Don’t compare only the headline number. A traditional quote may look cheaper until driveway replacement, landscaping repair, hauling, and concrete work are added. A trenchless quote may cost more per foot but include much less restoration. Ask both contractors to break their estimates into the same categories: diagnosis, excavation or access, pipe work, permits, connections, cleanup, and restoration. That shows whether trenchless is saving money, saving disruption, or both.
For full sewer replacement pricing across all methods, see our guide to sewer line replacement cost.
Trenchless Sewer Replacement: Frequently Asked Questions
Is trenchless sewer replacement cheaper than digging?
Not always. It often costs more per foot, but it can cost less overall when the line runs under a driveway, patio, or landscaping that would be expensive to restore after digging.
How long does trenchless sewer replacement take?
Many residential trenchless jobs are completed in about a day or two, compared with several days for many open-trench projects. Pipe condition, length, permits, and access can extend the timeline.
How long does a trenchless sewer line last?
Angi notes that sewer pipe liners are rated to last up to about 50 years. New pipe installed by pipe bursting, often HDPE plastic, is generally expected to last for decades as well. Ask your contractor about the specific product and its warranty.
Does pipe lining make the pipe smaller?
Lining adds a thin layer inside the existing pipe, so it can slightly reduce the inside diameter. Ask the contractor how much and whether it affects flow for your line.
Does homeowners insurance cover trenchless sewer repair?
Standard policies often don’t cover sewer line damage from age, wear, or roots. Some insurers offer service line add-on coverage. Check your policy before work begins.
The Bottom Line on Trenchless Sewer Line Replacement Cost
For planning, trenchless sewer work commonly falls around $60 to $250 per linear foot. Pipe bursting often runs about $60 to $200 per foot, and CIPP lining about $90 to $250 per foot, with many projects totaling around $1,900 to $6,000.
Trenchless methods can reduce damage to yards, driveways, and landscaping, which can make the total project more attractive even when the pipe work costs more. Before approving a project, make sure you understand whether it’s a replacement or a rehabilitation, why that method fits your sewer’s condition, how much digging is still required, and exactly what restoration is included.
Get the Free Before You Hire Checklist
Download our free Before You Hire Home Repair Cost Checklist. Use it to compare sewer quotes, catch missing line items, and avoid costly surprises.
Sources
- HomeGuide: Sewer Line Repair and Replacement Cost
- Angi: Trenchless Sewer Line Replacement Cost (2026 Data)
- HomeGuide: Sewer Camera Inspection Cost
- ASTM International: F2561 Cured-in-Place Sewer Lateral Rehabilitation Standard
House Care
Compass provides general educational information to help homeowners better understand repair and replacement decisions.
Cost figures are national planning estimates and will vary by location, home, and contractor. For advice about your
specific home or project, consult an appropriately qualified professional.
AC Condenser Replacement Cost: What Homeowners Should Know
Last updated: September 2026
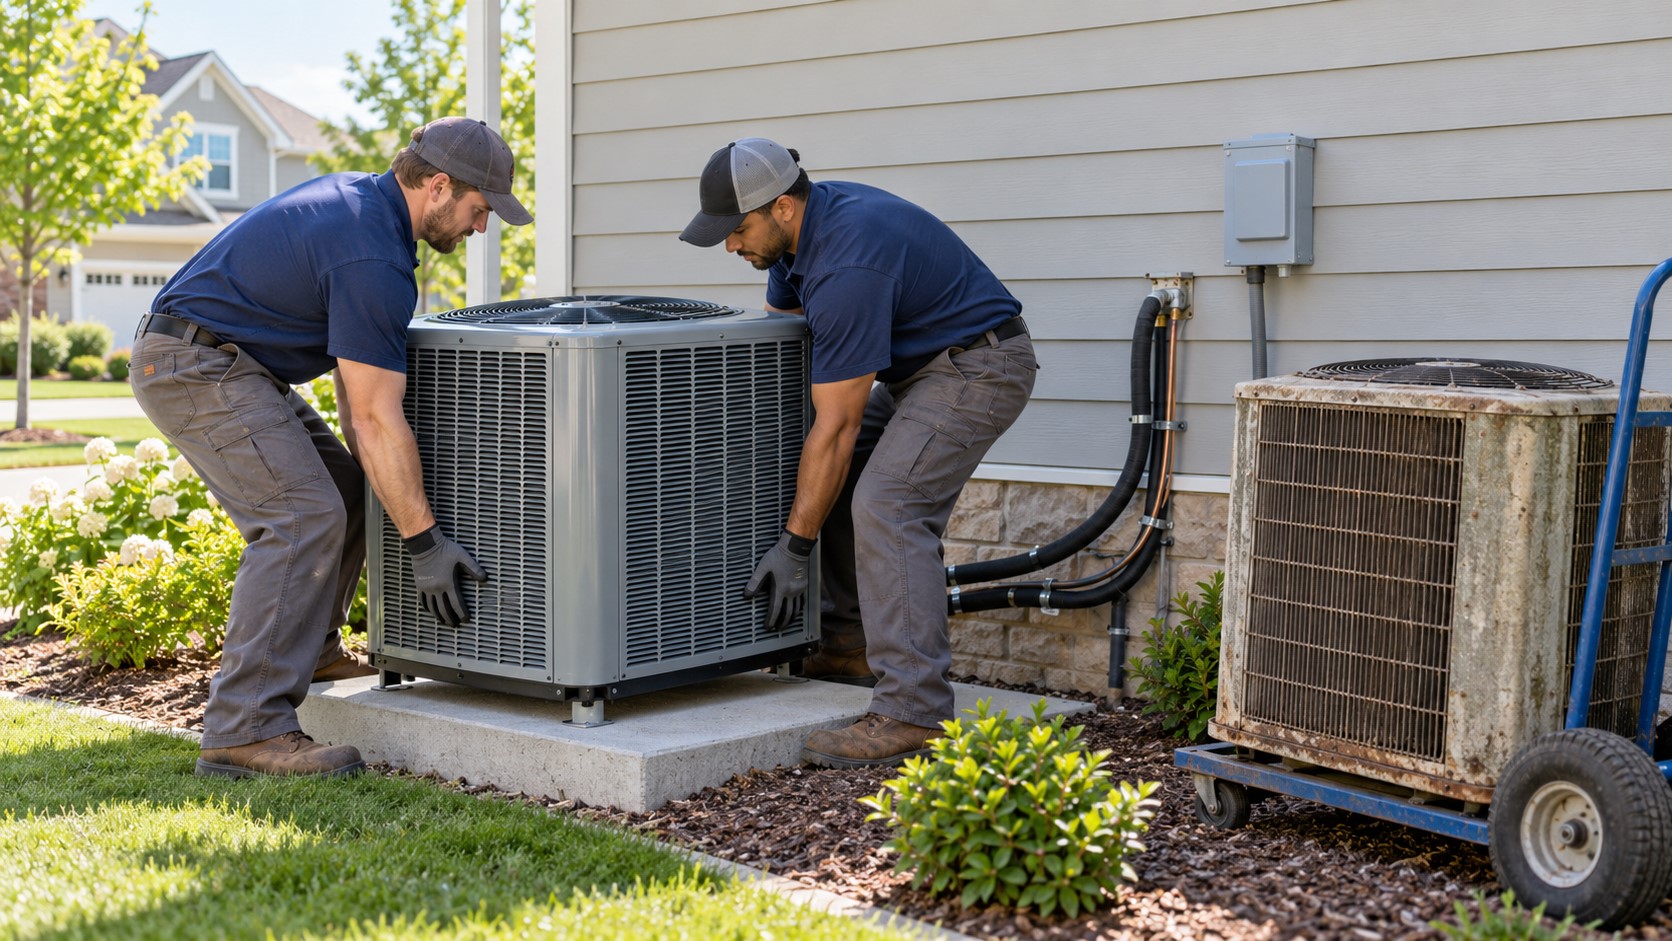
When an HVAC technician says the condenser needs replacing, the price can sound close enough to a whole new system that it raises an obvious question: should you replace the outdoor unit, repair one part, or replace more of the AC system? This guide covers current costs, what drives the price, and how to decide.
Quick Answer: How Much Does AC Condenser Replacement Cost?
- Full outdoor condensing unit: roughly $1,300 to $6,100 installed, with a national average around $2,900 (Angi, 2026). Many homeowners pay about $2,500 to $5,000.
- Condenser coil only: often about $800 to $3,000.
- Under warranty: you may pay mainly labor and related charges, roughly $300 to $1,200 (HomeGuide).
- Biggest cost drivers: system size, efficiency, warranty status, compatibility with your indoor coil, refrigerant, electrical or line-set changes, and local labor.
- These are national planning figures. A diagnosis and written quote for your system can differ significantly.
What Is the AC Condenser?
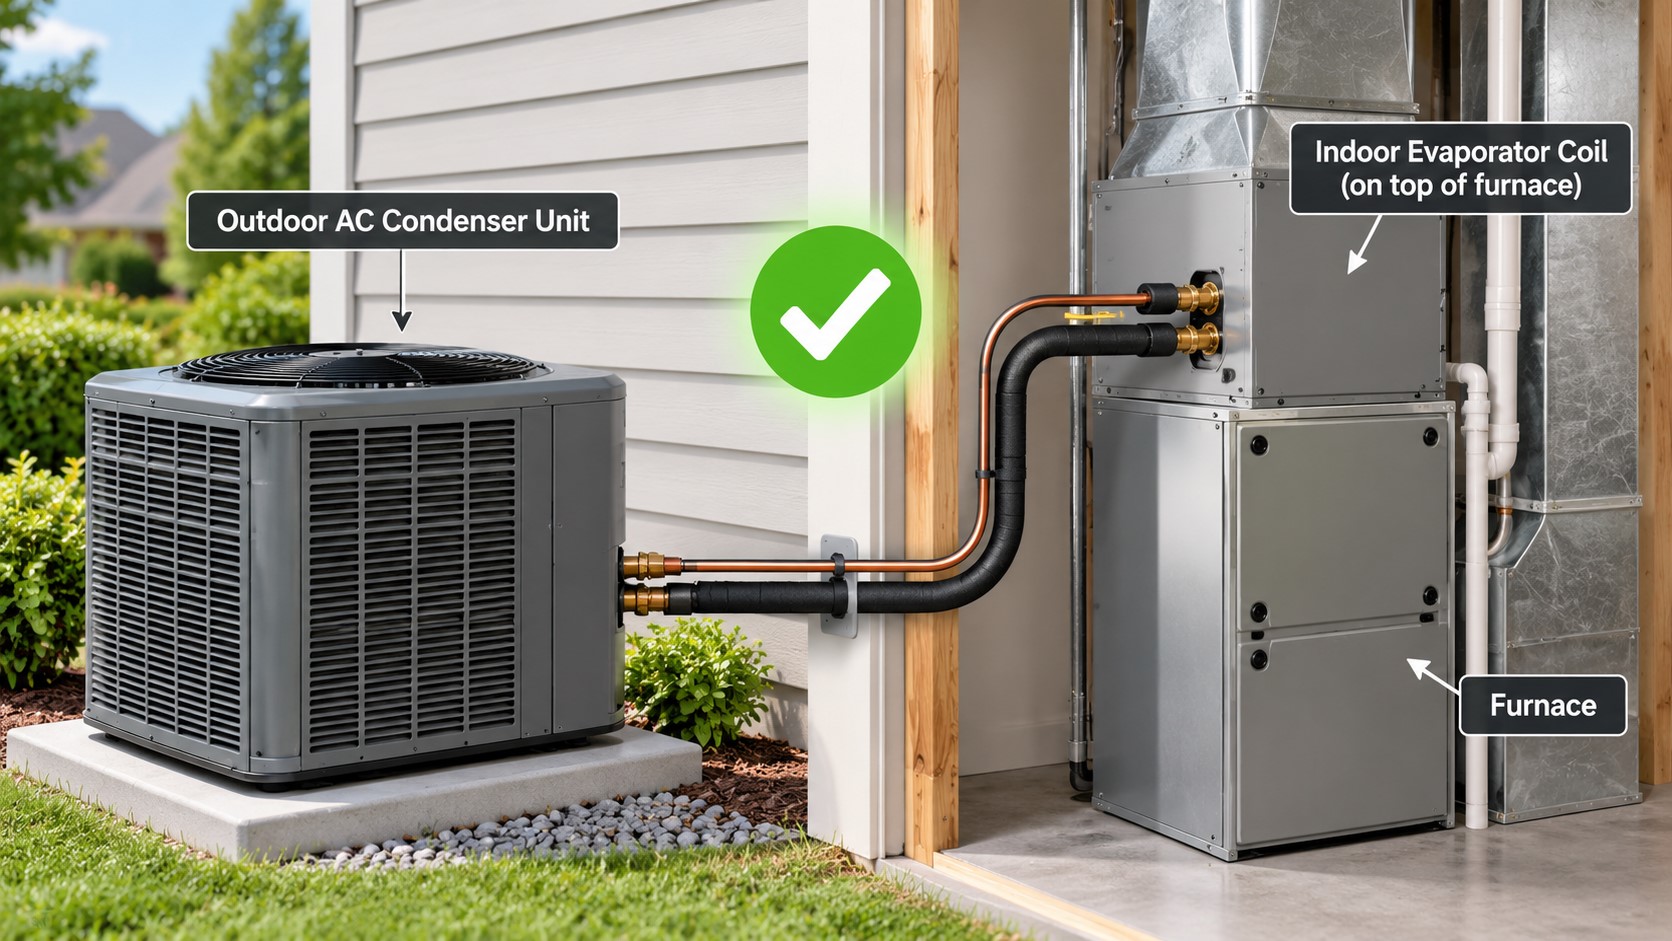
In a typical split central air system, the outdoor unit is often called the condenser or condensing unit. Its job is to release outdoors the heat your system removed from inside the house.
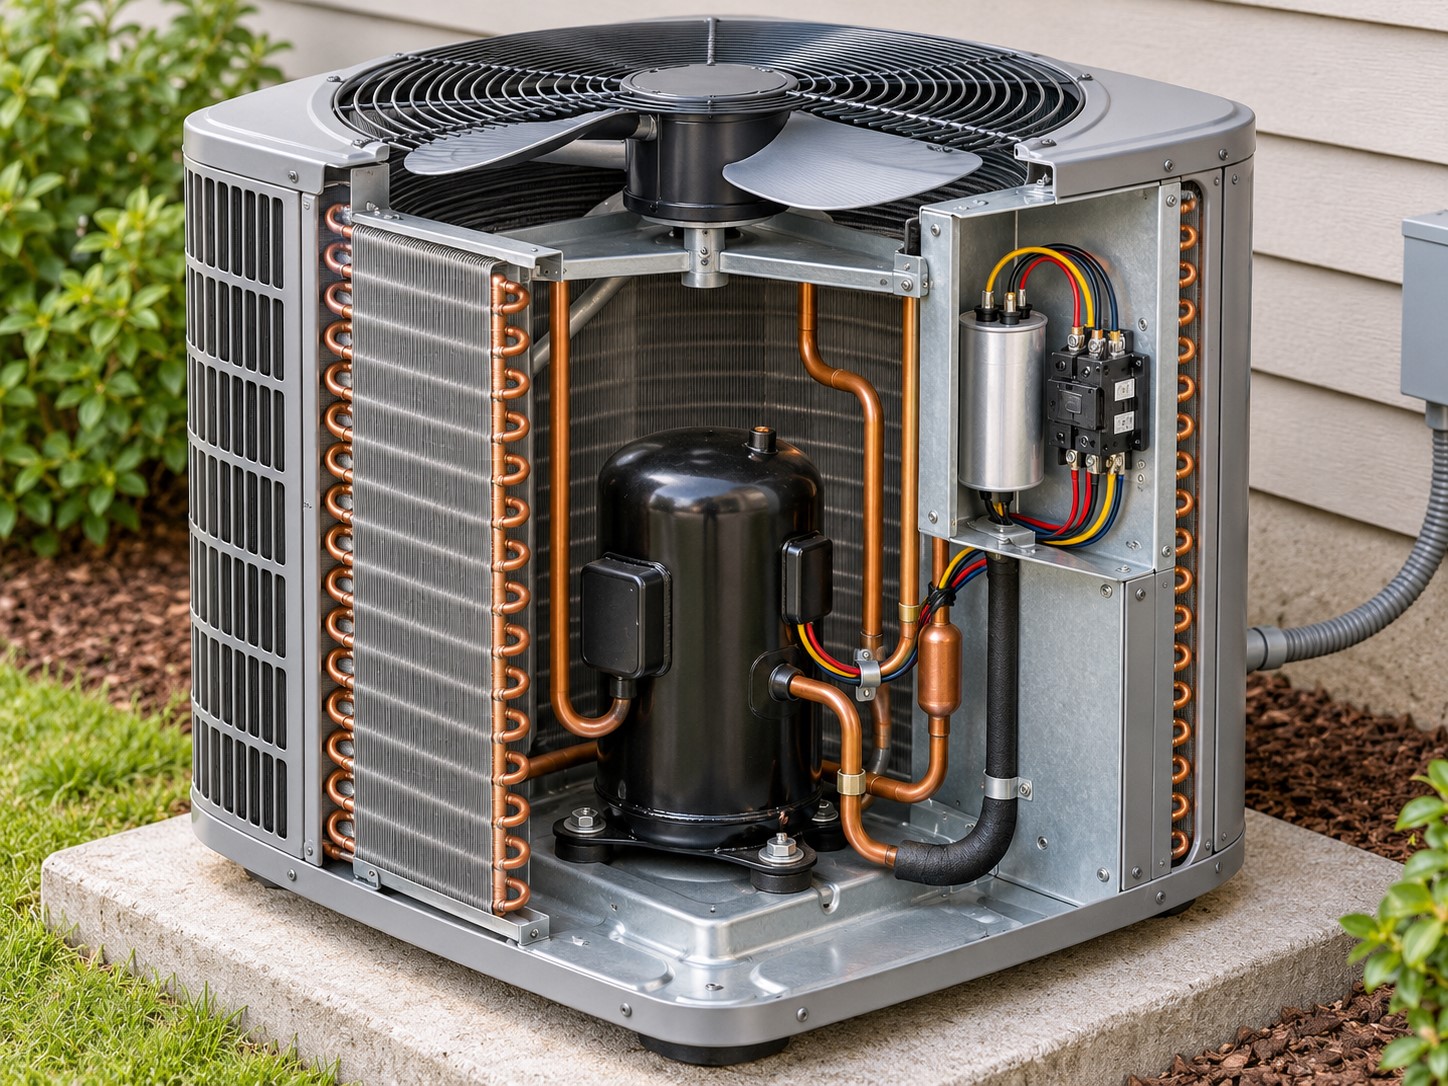
The outdoor unit contains the condenser coil and usually also houses the compressor, fan, fan motor, capacitor, contactor, and other controls. The condenser coil and the compressor are different parts, even though both sit in the same cabinet. That matters, because replacing one failed part can cost much less than replacing the entire outdoor unit.
How Much Does AC Condenser Replacement Cost?
Angi’s 2026 data places full AC condenser replacement at about $1,300 to $6,100, with a national average near $2,900. HomeAdvisor reports that most homeowners pay roughly $2,500 to $5,000, also averaging about $2,900. HomeGuide lists about $1,200 to $4,200 for many out-of-warranty replacements and roughly $300 to $1,200 when the equipment is under warranty. The figures differ because each guide uses different project samples and assumptions.
AC Condenser Replacement Cost by Size
| AC System Size | Estimated Installed Cost |
|---|---|
| 1.5 tons | $1,300 – $2,200 |
| 2 tons | $1,350 – $2,500 |
| 3 tons | $1,850 – $3,000 |
| 5 tons | $2,150 – $5,000 |
Source: Angi 2026 national cost data (materials and labor). Higher-efficiency or variable-speed units cost more.
Use these numbers as a budget, not a quote. A basic 1.5-ton single-stage unit is a very different project from a 5-ton high-efficiency system that needs electrical or refrigerant-line changes.
Condenser Coil vs. Full Condensing Unit vs. Other Parts
A quote to replace the condenser coil isn’t the same as a quote to replace the whole outdoor unit. And many outdoor-unit problems come from smaller parts. Here’s how typical costs compare:
| Repair | Typical Cost |
|---|---|
| Capacitor replacement | $100 – $400 |
| Condenser coil replacement | $800 – $3,000 |
| Compressor replacement | $800 – $2,300+ |
| Full outdoor condensing unit | $1,300 – $6,100 |
Source: Angi 2026 national cost data. For compressor-specific pricing, which varies more widely by guide, see our AC compressor replacement cost guide.
If the coil is the only failed part and the rest of the outdoor unit is in good shape, a coil replacement may be an option. But if the compressor, fan, cabinet, or controls are also worn, or the equipment is older, replacing the whole outdoor unit may make more financial sense. That’s a diagnosis and comparison question the coil price alone can’t answer.
What Makes AC Condenser Replacement More Expensive?
- System size (tonnage): larger equipment costs more. The right size should match your home’s cooling needs and your indoor equipment.
- Efficiency (SEER2): higher-efficiency condensers cost more upfront and may need compatible indoor equipment or controls to reach their rated efficiency.
- Single-stage, two-stage, or variable-speed: more advanced equipment can cost substantially more and may need matched communicating controls.
- Warranty coverage: if the unit or a major part is still covered, you may mainly pay for labor, refrigerant, and materials.
- Refrigerant and compatibility: the new outdoor unit must work with the refrigerant and components in your existing system, which matters more during the shift away from R-410A.
- Electrical work: a new disconnect, breaker, wiring, or surge protection may be needed.
- Refrigerant lines: the existing line set may be reused, flushed, modified, or replaced.
- Labor and permits: Angi notes most jobs take about 3 to 6 hours, and permits may run roughly $250 to $400 depending on your area.
Comparing AC Repair Quotes?
Our free Before You Hire Home Repair Cost Checklist helps you line up estimates side by side, spot missing line items, and ask the right questions before you sign.
Can You Replace Just the Outdoor Condenser?
Sometimes, but the new unit has to work correctly with your indoor coil and the rest of the system. Manufacturers often recommend matched indoor and outdoor equipment because the pairing affects capacity, efficiency, refrigerant control, and warranty eligibility. A new outdoor unit paired with an incompatible indoor coil can cause performance problems and may not reach its advertised efficiency.
If a contractor recommends replacing only the condenser, ask: “How will this outdoor unit be matched to my existing indoor coil, and is the combination an approved or rated match?”
What the 2026 Refrigerant Rules Mean for Condenser Replacement
The refrigerant transition has caused a lot of confusion for homeowners with R-410A systems. EPA guidance says existing residential AC systems can continue to be used and repaired throughout their useful life, including replacing a major component such as a condensing unit or compressor. R-410A components can still be made and sold for servicing existing systems.
So a failed R-410A condenser doesn’t automatically force you to replace the whole system. However, if both the outdoor unit and the indoor coil are replaced together, the project can be treated as a new system under EPA rules, which can affect the options a contractor offers. In May 2026, the EPA also revised the rules so qualifying older inventory can continue to be installed until it runs out. The practical takeaway: ask exactly what refrigerant and equipment generation you’re being quoted.
Repair One Part or Replace the Condenser?
A condensing unit has several serviceable parts. A failed capacitor, contactor, fan motor, or even compressor doesn’t always require replacing the whole outdoor unit. A capacitor replacement, for example, often runs about $100 to $400, far less than a new condenser.
The decision changes when several expensive parts are failing, the unit is badly corroded, parts are hard to get, the equipment is near the end of its life, or the indoor equipment is also in poor shape. Ask the technician to identify the failed part and explain why repairing it is or isn’t practical before approving a full replacement.
Replace the Condenser or the Whole AC System?
This is often the most important financial question in the estimate.
Replacing only the outdoor unit can make sense when:
- The indoor coil and furnace or air handler are relatively new, compatible, and in good condition.
- Warranty coverage significantly lowers the condenser cost.
A full system replacement deserves a look when:
- The indoor coil or furnace/air handler is also old.
- The new outdoor unit can’t be properly matched to the existing indoor equipment.
- The system has a history of costly repairs.
- The price gap between condenser-only and a complete replacement is relatively small.
Many standard-to-midrange central AC replacements run about $5,000 to $12,500. See our guide to AC replacement cost for the full breakdown. Don’t compare a condenser-only quote with a whole-system quote as if they’re competing prices for the same job. Compare what’s being replaced, what stays, the warranties, the efficiency, and the likely condition of the equipment you keep.
Questions to Ask Before Replacing an AC Condenser
- Which part actually failed: the condenser coil, compressor, fan, or the whole outdoor unit?
- Can the failed part be repaired or replaced on its own?
- What is the model and tonnage of the proposed outdoor unit?
- Is it properly matched to my existing indoor coil and furnace or air handler?
- What refrigerant does my current system use, and what does the replacement use?
- Are you quoting a repair part for my existing system, or a new-system replacement?
- Is any of the equipment still under a manufacturer warranty?
- Does the quote include refrigerant work, line-set work, electrical changes, permits, startup, and disposal?
- What parts and labor warranties apply?
- If I replaced the whole AC system instead, what would the extra cost get me in age, efficiency, and warranty?
How to Compare Condenser Replacement Estimates
Two condenser quotes can differ by thousands of dollars without either being wrong. One contractor may be quoting a basic single-stage unit that works with your existing indoor coil. Another may include higher-efficiency equipment, a new indoor coil, electrical upgrades, a new line set, or a broader system replacement. Compare model numbers, capacity, SEER2 rating, refrigerant, which equipment is being replaced, warranties, labor, permits, and any electrical or refrigerant-line work.
If you’re considering high-efficiency equipment, note that the federal 25C tax credit ended for equipment installed after 2025, but your utility may still offer rebates. Ask your contractor which rebates the proposed unit qualifies for.
AC Condenser Replacement: Frequently Asked Questions
What’s the difference between the condenser and the compressor?
The condenser (or condensing unit) is the whole outdoor unit. The compressor is one part inside it that pressurizes the refrigerant. A compressor can often be replaced without replacing the entire condenser.
How long does it take to replace an AC condenser?
Angi notes most condenser replacements take about 3 to 6 hours. Waiting for equipment, permits, or electrical changes can add time.
How long does an AC condenser last?
Central AC equipment typically lasts roughly 10 to 20 years depending on climate, maintenance, and installation quality. Coastal salt air and heavy use can shorten that.
Can I replace an AC condenser myself?
No. Replacing a condenser involves handling refrigerant, which requires EPA Section 608 certification, plus high-voltage electrical work. Hire a licensed HVAC contractor.
The Bottom Line on AC Condenser Replacement Cost
For budgeting, roughly $1,300 to $6,100 is a reasonable national range for many full condensing-unit replacements, with a national average around $2,900. A coil-only or smaller component repair may cost much less.
The best decision comes from identifying what actually failed, then comparing the condenser-only option against the condition, compatibility, age, and warranty status of the rest of your system. If your system uses R-410A, current EPA rules still allow repairs, including replacing the condensing unit, so a condenser failure doesn’t automatically mean you need an entirely new system.
Get the Free Before You Hire Checklist
Download our free Before You Hire Home Repair Cost Checklist. Use it to compare HVAC quotes, catch missing line items, and decide with confidence.
Sources
- Angi: How Much Does It Cost to Replace an AC Condenser? (2026 Data)
- HomeAdvisor: AC Condenser Replacement Cost
- HomeGuide: AC Condenser Replacement Cost
- Carrier: Understanding Your AC Condenser Unit
- Trane: AC Condenser Replacement Cost
- U.S. EPA: Frequent Questions on the Phasedown of HFCs
- U.S. EPA: Technology Transitions HFC Restrictions by Sector
House Care
Compass provides general educational information to help homeowners better understand repair and replacement decisions.
Cost figures are national planning estimates and will vary by location, home, and contractor. For advice about your
specific home or project, consult an appropriately qualified professional.
Roof Inspection Cost: What You Pay and What an Inspection Covers

Last updated: September 2026
A roof inspection can be a relatively inexpensive way to find out whether your roof has a small repair problem, broader wear, storm damage, or signs that replacement may be getting closer. The price matters, but so does the scope: a free inspection that comes with a roofing estimate isn’t necessarily the same service as an independent, paid inspection with a written report.
Quick Answer: How Much Does a Roof Inspection Cost?
- Many stand-alone residential roof inspections cost about $100 to $400. Angi’s 2026 data puts the national average around $252.
- Basic physical inspections may run $75 to $200, drone inspections about $150 to $400, and infrared inspections about $400 to $600.
- Costs rise for large, steep, multi-story, or hard-to-access roofs, and when a written certification is needed.
- Before comparing prices, ask whether the fee includes an attic review, photos, a written report, and any certification your insurer or lender requires.
How Much Does a Roof Inspection Cost?
National cost guides generally place a residential roof inspection at about $100 to $400 (HomeGuide). Angi’s 2026 data puts the national average at about $252, with most homeowners paying between $125 and $383.
Roof Inspection Cost by Type

| Inspection Type | Typical Cost | What It Involves |
|---|---|---|
| Physical | $75 – $200 | Visual check from the ground, eaves, ladder, or roof surface when safe |
| Drone | $150 – $400 | Detailed aerial photos of steep, tall, or fragile roofs |
| Infrared (thermal) | $400 – $600 | Thermal imaging that can flag possible trapped moisture |
| Roof certification (add-on) | $75 – $200 | A written opinion on the roof’s condition, often for a sale or insurer |
| Attic inspection | $200 – $500 | A closer look at the underside of the roof deck, insulation, and ventilation |
Sources: Angi 2026 data and HomeGuide national cost data. Local prices vary.
These services aren’t interchangeable. An inspector visually checking a simple one-story asphalt roof is doing a different job than someone evaluating a steep multi-story roof with a drone or infrared camera. Local labor rates and common roof designs in your area also shift the price.
Why Some Roof Inspections Are Free
Roofing contractors often offer a no-charge inspection when you’re considering repair or replacement. In that case, the inspection is usually part of their estimating process. That can be useful: if you want to know what a roofer thinks needs fixing and what it might cost, a contractor inspection may answer that without a separate fee.
But a free, estimate-focused inspection isn’t automatically equivalent to an independent inspection. The scope may be narrower, the documentation may differ, and the contractor has a financial interest in the work that follows. If you need documentation for a home sale, insurance requirement, dispute, warranty issue, or an independent second opinion, confirm that the service you hire will provide the type of report you actually need.
What Does a Roof Inspection Usually Cover?
Scope varies, but recognized home-inspection standards commonly include visible roofing materials, drainage, flashing, skylights, chimneys, vents, and other roof penetrations. An inspector may look at:
- Roofing materials: missing, cracked, curled, or damaged shingles, tiles, or metal panels
- Flashing and penetrations: chimneys, skylights, vents, valleys, and places where the roof meets a wall
- Gutters and drainage: clogged or damaged gutters and spots where water collects
- Visible structural issues: sagging, unusual dips, or visible decking damage
- Signs of leaks: interior stains, damp materials, or water tracks
- Attic conditions (when safely accessible): moisture stains, wet decking, or ventilation problems
Will the Inspector Walk on the Roof?
Not necessarily. Industry standards don’t require an inspector to walk every roof. InterNACHI’s standards, for example, allow inspection from the ground or eaves and say an inspector isn’t required to walk on a roof that’s unsafe. Steep, fragile, wet, icy, or storm-damaged roofs may be inspected with binoculars, a ladder at the eaves, photos, or a drone instead. What matters is whether the method fits the roof, and whether the report explains any limitations.
Why the Attic Matters
The roof surface tells only part of the story. When the attic is safely accessible, it can reveal moisture stains, damp insulation, decking damage, ventilation issues, or water tracks you can’t see from outside. Not every inspection includes an attic review, and some decking damage stays hidden until the shingles come off. Ask before scheduling whether the attic is included, and if not, what the inspector will and won’t be able to evaluate.

What Makes a Roof Inspection Cost More?
- Roof size: larger roofs take longer to inspect and document.
- Pitch and height: steep or two- to three-story roofs need more time, equipment, or remote methods.
- Complexity: valleys, dormers, chimneys, skylights, and additions create more areas to check.
- Roofing material: slate, tile, wood shake, and metal may require different access or evaluation methods.
- Access limits: trees, locked or cramped attics, or unsafe conditions can complicate the job.
- Technology: drone photography and infrared imaging add cost.
- Documentation: a detailed report, certification, or insurer form may add to the fee.
Getting a Roof Inspected Before Repairs?
Our free Before You Hire Home Repair Cost Checklist helps you compare inspection reports and roofing estimates, spot missing line items, and ask the right questions.
Roof Inspection vs. Roof Certification
An inspection documents what the inspector observed. A certification is a separate document giving an opinion about the roof’s condition or remaining life for a specific purpose, such as a home sale or insurance requirement. HomeGuide notes that a roof generally needs roughly 2 to 5 years of remaining useful life to be certified. A certification is an opinion based on the inspection and its limits. It isn’t a guarantee the roof won’t leak.
If an insurer, lender, or buyer asked for the inspection, find out exactly what document they need before you schedule.
When Is a Paid, Independent Roof Inspection Worth It?
- You’re buying a home and want more roof detail than a general home inspection provides.
- You’ve received very different recommendations from roofers and want another opinion.
- You suspect storm damage but don’t know how extensive it is.
- You have a recurring leak that previous repairs haven’t fixed (see our guide to roof leak repair).
- An insurer, lender, buyer, or warranty provider requires specific documentation.
- You want a condition report before deciding whether to repair or replace an aging roof.
How Often Should You Have Your Roof Inspected?
Angi suggests a professional inspection about every two years in mild climates, and every year in areas with frequent high winds or heavy precipitation. It’s also smart to schedule one after a major storm, before buying or selling a home, and when your roof is approaching the end of its expected lifespan.
What Should a Roof Inspection Report Include?
A useful report should make the findings easy to understand. Look for:
- A description of the roof and the inspection method used
- Observed conditions and photos
- Areas that couldn’t be inspected, and why
- Signs of leaks or damage
- Recommendations for repair or further evaluation
If you’re using the report to compare repair and replacement quotes, it’s especially helpful when it separates observed defects from optional upgrades. HomeGuide notes that reports typically arrive within 1 to 2 days, and the inspection itself usually takes 45 minutes to a few hours.
Questions to Ask Before Hiring a Roof Inspector
- What does the inspection fee include?
- Will I receive a written report and photos?
- Will you check the attic or underside of the roof deck if it’s safely accessible?
- How will you inspect steep or inaccessible areas?
- Is drone or infrared imaging included, optional, or unnecessary for my roof?
- Will the report note limitations and areas you couldn’t evaluate?
- Is this an independent inspection, a contractor estimate, or both?
- If I need a certification or insurer form, is that included?
- Are repair recommendations or cost estimates included, or separate?
Don’t Judge an Inspection by the Lowest Price
A $100 inspection and a $400 inspection may not be competing versions of the same service. One may be a basic visual check of an easy roof. The other may include an attic review, extensive photos, a formal report, drone imagery, or documentation for a specific transaction. Compare scope before price: what’s inspected, how hard-to-reach areas are handled, what you receive afterward, and whether the inspector is also trying to sell you the repair.
Once you know what your roof needs, our guides to roof repair cost and roof replacement cost can help you check whether the quotes you receive are reasonable.
Roof Inspection Cost: Frequently Asked Questions
How long does a roof inspection take?
Many inspections take about 45 minutes to a few hours depending on roof size and complexity, with a written report often delivered within 1 to 2 days.
Does a home inspection include the roof?
A general home inspection usually includes a visual check of the roof, but it may be less detailed than a roof-focused inspection, and the inspector may not walk the roof. If the roof is older or you have concerns, a dedicated roof inspection can add useful detail.
Are free roof inspections worth it?
They can be, especially if you want a repair or replacement estimate anyway. Just remember the contractor may also be selling the work. For an independent opinion or formal documentation, a paid inspection may be the better choice.
Does homeowners insurance pay for a roof inspection?
Usually not as routine maintenance. After a storm, your insurer may send its own adjuster to assess damage as part of a claim. Check your policy or ask your insurer.
The Bottom Line on Roof Inspection Cost
For planning, about $100 to $400 is a reasonable range for many stand-alone residential roof inspections, with a national average around $252. Simple physical inspections may cost less, while steep, complex, drone, or infrared inspections can cost more.
The more important question is what the inspection includes. A good inspection should help you understand the roof’s observed condition, the limits of the inspection, and what, if anything, deserves repair, further evaluation, or replacement consideration.
Get the Free Before You Hire Checklist
Download our free Before You Hire Home Repair Cost Checklist. Use it to compare roofing quotes and ask the right questions before you commit.
Sources
- HomeGuide: Roof Inspection Cost
- Angi: How Much Does a Roof Inspection Cost? (2026 Data)
- InterNACHI: Home Inspection Standards of Practice
- American Society of Home Inspectors: Standard of Practice
- OSHA: Roof Inspection Safety Guidance
House Care
Compass provides general educational information to help homeowners better understand repair and replacement decisions.
It does not inspect or diagnose specific roofs. For advice about your specific home or project, consult an appropriately
qualified professional.
9 Signs of Sewer Line Problems Homeowners Should Know

Last updated: September 2026
A sewer line problem often gives warning signs before it becomes a full sewage backup. The challenge is that some of those signs can also come from an ordinary fixture clog, so one symptom alone doesn’t mean the buried sewer line has failed. The pattern matters. A single slow sink may point to a local clog. Slow drains, gurgling, or backups across several fixtures, especially toilets, tubs, showers, or lower-level drains, are a stronger reason to suspect the main sewer line.
Quick Answer: Signs Your Sewer Line May Have a Problem
- Several drains are slow at the same time
- Toilets or drains gurgle when other fixtures are used
- Wastewater backs up into a tub, shower, toilet, or floor drain
- The same main-line clog keeps coming back
- Sewage odors, wet or sunken spots in the yard, or sewage outside
What to do: If sewage is backing up, limit water use and avoid contact with it. For recurring problems, a sewer camera inspection (often about $100 to $500) can show what’s actually wrong before you approve a major repair.
What Is the Home Sewer Line?
In homes connected to a municipal sewer system, wastewater from toilets, sinks, tubs, showers, and appliances leaves the house through a pipe that connects to the public sewer main. Depending on where you live, it may be called a sewer lateral, side sewer, or building sewer.
Who’s responsible for that pipe varies by local rules, but homeowners are commonly responsible for at least part of the line between the house and the public system. Before approving major work, check with your local sewer utility about where your responsibility ends.
9 Warning Signs of Sewer Line Problems
1. Several Drains Are Slow at the Same Time
One slow drain doesn’t necessarily point to a sewer problem. Hair, soap residue, or food debris can slow a single fixture. It’s more concerning when toilets, tubs, showers, or sinks in different parts of the house start draining slowly around the same time. A blockage farther downstream can affect multiple fixtures because they all feed into the same main line. If clearing one fixture doesn’t fix the broader pattern, it’s usually time to have the main line evaluated.
2. Toilets or Drains Gurgle Repeatedly
Gurgling happens when air is pushed or pulled through water in the plumbing. One occasional sound doesn’t diagnose anything, but repeated gurgling, especially when another fixture is used, can accompany a restriction. For example, a toilet may gurgle when the washing machine drains, or a tub may bubble when a toilet is flushed. EPA guidance lists gurgling plumbing as a warning sign of wastewater system trouble, though the exact cause still needs to be found.
3. Wastewater Backs Up Into a Tub, Shower, Toilet, or Floor Drain
A backup is one of the clearest signs that wastewater isn’t moving normally. When the sewer line is blocked, wastewater has nowhere to go and can come back up through the lowest fixture, such as a basement floor drain, first-floor tub, or shower.
Don’t keep running water to “test” the problem. Extra flushing, laundry, showers, or dishwasher use sends more water into a line that may already be blocked.
4. You Notice a Sewage Odor Inside or Outside
A persistent sewer odor deserves attention, but smell alone doesn’t prove the pipe is broken. Dry drain traps, vent problems, and other issues can cause sewer-gas smells too. When odor shows up together with slow drains, gurgling, backups, or wet areas outside, it becomes a more meaningful part of the pattern.
5. The Same Main-Drain Clog Keeps Coming Back
A one-time blockage can often be cleared without finding structural damage. Repeated main-line clogs are different. If the sewer has been cleaned and backs up again, ask what’s causing it. Roots, damaged pipe, offset joints, grease buildup, or a sagging or collapsed section can cause problems that cleaning alone won’t permanently fix.
6. Trees or Large Roots Are Near the Sewer Line
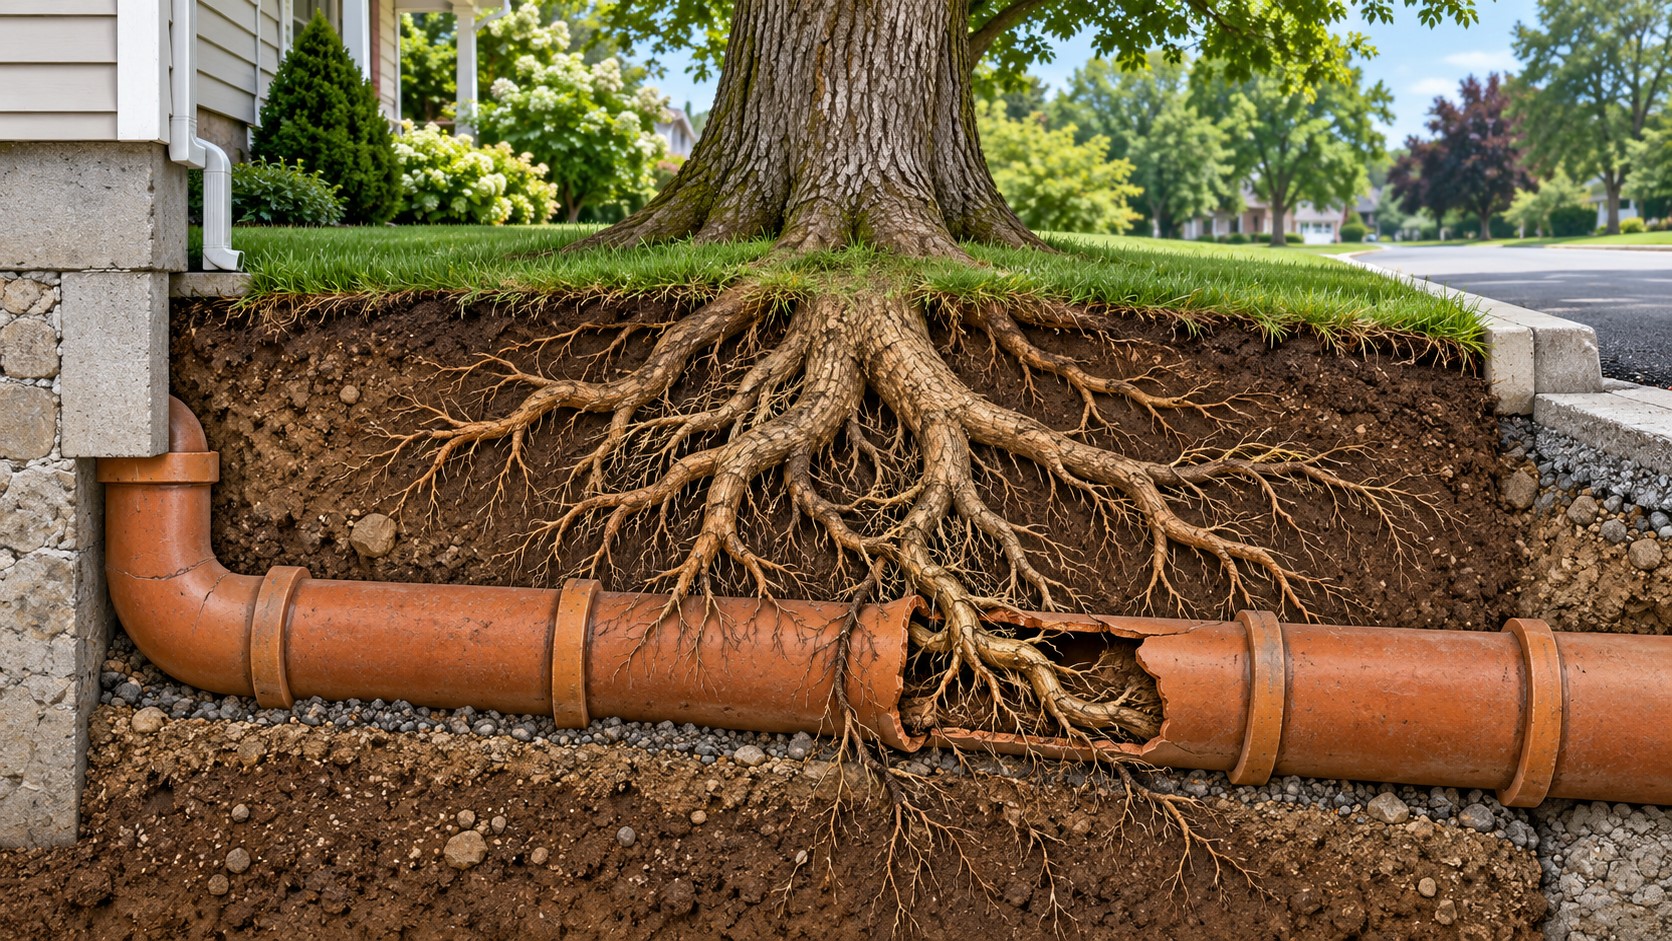
Tree roots don’t automatically damage every nearby sewer line, but they can enter through cracks, joints, or other openings in a defective pipe. The EPA identifies root intrusion through sewer defects as one cause of blockages. The key question isn’t whether a tree is nearby. It’s whether roots have actually gotten into the pipe. A camera inspection can show that.
7. A Wet, Sunken, or Soft Area in the Yard
A damaged sewer line can leak wastewater into the surrounding soil. You might notice a persistently damp area, soft ground, settling, or a depression along the sewer line’s path. Not every wet spot is a sewer leak. Irrigation, stormwater, a water-supply leak, or drainage problems can look similar. But a new wet or sunken area combined with odors or indoor drain problems deserves a professional look.
8. A Patch of Grass Grows Differently
Unusually green or fast-growing grass over a wastewater line can sometimes accompany a leak, since wastewater adds moisture and nutrients. This sign is more common with septic systems and is weak evidence on its own. Treat it as a supporting clue, not a diagnosis.
9. You See or Smell Sewage Outside
Visible wastewater on the ground, or sewage coming from a cleanout or low area, needs prompt attention. Sewage can contain bacteria, viruses, and other disease-causing organisms. Keep children and pets away, avoid contact, and contact a qualified plumber or your local utility. If you’re not sure whether the problem is on your line or the public main, your utility may be able to help figure out which side is affected.
Local Drain Clog or Main Sewer Problem?

This pattern can help you judge what’s more likely. It isn’t a substitute for an inspection.
| What You’re Seeing | What It May Point To |
|---|---|
| One fixture is slow or blocked | A local clog in that fixture or branch drain is often more likely |
| Several fixtures are slow or gurgling | A blockage in the main drain or sewer line becomes more likely |
| Water comes up in a lower drain when another fixture is used | A downstream blockage that needs prompt evaluation |
| The main line has needed repeated cleaning | Possible roots, structural damage, or another recurring cause |
| Neighbors have backups at the same time | Possibly a public sewer problem; contact your local utility too |
What Causes Sewer Line Problems?
Warning signs tell you something may be wrong, not exactly why. Common causes include grease or debris buildup, items that shouldn’t have been flushed, root intrusion through pipe defects, separated or offset joints, cracks, corrosion in some older pipes, pipe deformation, or a collapsed section. Ground movement, age, poor original installation, and nearby construction can also play a role. The cause matters: a clog that can be cleaned is very different from a failed pipe that needs repair or replacement.
How a Sewer Line Problem Is Confirmed
A plumber or sewer contractor will usually start by figuring out whether the blockage is in one fixture, a larger drain inside the house, or the sewer lateral. From there, a video camera inspection is the most common way to see inside the line. Seattle Public Utilities specifically recommends hiring a plumber or sewer inspector who can run a camera through the line, and DC Water notes that a TV inspection can help determine whether a lateral is clogged or collapsed.
A camera can reveal roots, debris, breaks, holes, displaced joints, or sags, and help locate the problem so repair discussions are based on something more specific than “the sewer keeps clogging.”
What Might Sewer Line Repairs Cost?
The fix, and the price, depends on what the inspection finds. These national ranges from HomeGuide and Angi can help you understand what you may be quoted:
| Service | Typical Cost |
|---|---|
| Sewer camera inspection | $100 – $500 |
| Snaking / clearing a main line clog | $150 – $600 |
| Hydro jetting | $250 – $800 |
| Root removal | $100 – $600 |
| Spot repair of a cracked section | $600 – $1,050 |
| Sewer line replacement | $50 – $250 per linear foot |
National planning figures. Depth, access, and restoration can change costs significantly.
Many problems are clogs that can be cleared for a few hundred dollars. Structural damage that needs a section or the whole line replaced can cost thousands. For a full breakdown of replacement methods and prices, see our guide to sewer line replacement cost.
Facing a Sewer Repair Quote?
Our free Before You Hire Home Repair Cost Checklist helps you compare plumbing and sewer estimates, spot missing items like restoration and permits, and ask the right questions before you sign.
Questions to Ask After a Sewer Camera Inspection
- Can you show me the part of the video where the problem appears?
- What exactly do you see: roots, grease, a crack, a hole, an offset joint, a sag, or a collapse?
- Where is the problem relative to the house, property line, and public sewer?
- Will cleaning likely solve it, or is there structural damage that needs repair?
- Can just the damaged section be repaired, or are you recommending a longer replacement? Why?
- Are trenchless methods possible here, or would digging be required?
- What restoration work is included if digging is needed?
- Do local permits or utility coordination apply?
When to Treat It as Urgent
Get prompt help, rather than continuing to use your plumbing normally, when:
- Raw sewage is backing up into the house
- Several fixtures suddenly stop draining
- Wastewater is surfacing outside
- A lower-level drain backs up whenever water is used elsewhere
- A strong sewage odor comes with active drainage problems
- The backup is near electrical equipment or creates another safety concern
Safety note: Avoid direct contact with sewage. The EPA notes that untreated sewage can
carry harmful pathogens, and many utilities recommend limiting water use during an active backup so you don’t send more
wastewater into a blocked line.
What Not to Assume
- Not every slow drain means you need a new sewer line. Many drainage problems are clogs that can be cleared.
- Repeated cleaning doesn’t prove the pipe is healthy. If problems keep returning, ask whether the underlying cause has been found.
- Don’t approve a major replacement based on a vague “the pipe is bad.” Ask what was found, where, and why the recommended repair fits.
Does Homeowners Insurance Cover Sewer Line Problems?
Often, no. Standard homeowners policies typically don’t cover sewer line damage from age, wear and tear, or tree roots. Some insurers offer optional service line coverage for buried lines, and separate sewer backup coverage may help with damage inside your home from a backup, though usually not the pipe repair itself. Check your policy or ask your agent.
Sewer Line Problems: Frequently Asked Questions
How do I know if it’s a clog or a broken sewer line?
A single slow fixture usually points to a local clog. Multiple slow drains, backups in low drains, or clogs that keep returning suggest a main line issue. A camera inspection is the most reliable way to tell a clog from structural damage.
Can I use chemical drain cleaner for a sewer line clog?
Chemical cleaners are aimed at small fixture clogs and are unlikely to clear a main sewer line blockage. If several drains are affected, it’s better to have a professional evaluate the main line.
Why does my toilet gurgle when the washing machine drains?
That can happen when air is forced through the plumbing because water can’t flow freely downstream. It may point to a restriction in a shared drain or the sewer line, or a venting issue. A plumber can determine which.
Who do I call for a sewer line problem?
Start with a licensed plumber or sewer contractor who can clear the line and perform a camera inspection. If neighbors are having backups too, contact your local sewer utility as well.
The Bottom Line
The strongest warning signs of a sewer line problem are usually patterns: multiple slow drains, recurring main-line clogs, gurgling across fixtures, sewage backups, or signs of wastewater outside. Those symptoms don’t automatically mean the whole line needs replacing. They mean the system should be evaluated so the real cause can be found.
If sewage is backing into your home, reduce water use, avoid contact, and get professional help promptly. If the problem is recurring rather than urgent, a camera inspection gives you solid evidence before you make a major repair decision.
Get the Free Before You Hire Checklist
Download our free Before You Hire Home Repair Cost Checklist. Use it to compare sewer and plumbing quotes and avoid costly surprises.
Sources
- Seattle Public Utilities: Side Sewer Maintenance
- Seattle Public Utilities: Side Sewer Defects & Issues
- DC Water: Know What to Do if You Have a Sewer Backup
- U.S. EPA: Sanitary Sewer Overflow Frequent Questions
- U.S. EPA: Resolving Septic System Malfunctions
- Austin Water: Private Lateral Program
- HomeGuide: Sewer Line Repair Cost
- Angi: Sewer Line Replacement Cost (2026 Data)
House Care
Compass provides general educational information to help homeowners better understand repair and replacement decisions.
It does not diagnose specific problems. For advice about your specific home or project, consult an appropriately qualified
professional.
Furnace Replacement Cost: What Affects the Price?

Last updated: September 2026
Replacing a furnace is one of those projects where a national average is only a starting point. The final price depends on the type of furnace, how much heating your house needs, the efficiency level you choose, and whether the installation requires venting, duct, gas-line, or electrical changes. This guide covers current planning ranges, what drives the price, and what to ask before you sign.
Quick Answer: How Much Does Furnace Replacement Cost?
- Many standard furnace replacements cost roughly $3,500 to $7,500 installed. Angi’s 2026 data puts the national average around $4,800.
- Natural gas furnaces commonly run about $3,800 to $12,000 installed, with high-efficiency (96%+ AFUE) models at roughly $7,500 to $12,000 (HomeGuide).
- Biggest cost drivers: fuel type, furnace size, efficiency (AFUE), venting, ductwork, installation difficulty, permits, and gas-line or electrical work.
- 2026 note: the federal 25C tax credit for high-efficiency furnaces ended after 2025. Utility rebates may still be available.
- These are national planning figures. Your home’s price can differ, so compare itemized estimates for the same scope of work.
What Does a New Furnace Usually Cost?
National cost guides show a wide range because “furnace replacement” can describe very different projects. HomeGuide reports about $3,500 to $7,500+ installed for many standard-efficiency replacements, with high-efficiency models reaching about $11,500. Angi reports a 2026 national average of about $4,814, with most projects between roughly $2,823 and $6,896.
Use these ranges to set a budget before you request estimates, not to decide what your project “should” cost before anyone has looked at your house.
Furnace Replacement Cost by Fuel Type
| Furnace Type | Typical Installed Cost | Good to Know |
|---|---|---|
| Electric | $2,500 – $7,000+ | Lower equipment cost; operating cost depends on local electric rates |
| Natural gas | $3,800 – $12,000 | The most common type; requires gas line and venting |
| Oil | $4,000 – $10,000+ | Common in parts of the Northeast; needs a fuel tank |
| Propane | $3,000 – $12,000+ | Used where natural gas isn’t available; needs a propane tank |
Source: HomeGuide national cost data. Fuel conversions, such as switching from oil to gas, add cost beyond these figures.

The Biggest Factors That Affect Furnace Replacement Cost
1. Furnace Type and Fuel Source
Equipment, venting, fuel connections, and installation requirements differ by fuel type, so prices vary a lot. If your estimate involves switching fuels rather than a like-for-like replacement, ask the contractor to separate the conversion work from the furnace price.
2. Furnace Size and Heating Load
A larger furnace generally costs more, but bigger isn’t automatically better. Equipment should be sized to the actual heating needs of your house, not square footage alone or the size of the old furnace. The Air Conditioning Contractors of America (ACCA) describes Manual J as the ANSI-recognized standard for residential load calculations, accounting for climate, insulation, windows, air leakage, and duct losses.
Ask: “How did you determine the furnace size you’re recommending?”
3. Efficiency Rating (AFUE)

Gas and oil furnace efficiency is measured by AFUE (Annual Fuel Utilization Efficiency). A higher AFUE means more of the fuel becomes usable heat. An 80% AFUE furnace turns about 80 cents of every fuel dollar into heat, while a 96% AFUE model turns about 96 cents into heat.
Higher-efficiency furnaces cost more upfront. Current pricing data puts 96%+ AFUE gas furnaces at roughly $7,500 to $12,000 installed before unusually complex changes. Don’t compare two quotes without comparing AFUE. An 80% furnace and a 96% furnace aren’t equivalent bids.
HomeGuide’s gas furnace data shows how both efficiency and size affect installed cost:
| Gas Furnace Efficiency | Typical Installed Cost |
|---|---|
| Standard (80% – 89% AFUE) | $3,800 – $6,200 |
| Mid-efficiency (90% – 95% AFUE) | $5,200 – $8,800 |
| High-efficiency (96%+ AFUE) | $7,500 – $12,000 |
| Approx. Home Size | Typical Furnace Size | Typical Installed Cost (Gas) |
|---|---|---|
| Up to 1,200 sq. ft. | 40,000 – 50,000 BTU | $3,800 – $6,700 |
| 1,200 – 1,600 sq. ft. | 50,000 – 60,000 BTU | $4,200 – $7,200 |
| 1,600 – 2,000 sq. ft. | 60,000 – 70,000 BTU | $4,700 – $8,000 |
| 2,000 – 2,500 sq. ft. | 70,000 – 90,000 BTU | $5,100 – $9,500 |
| 2,500 – 3,000+ sq. ft. | 90,000 – 120,000 BTU | $5,800 – $12,000 |
Source: HomeGuide gas furnace cost data. Home size is only a rough guide; the right furnace size should come from a load calculation.
4. Venting and Condensate Drainage
High-efficiency (condensing) gas furnaces often need different venting than older units, usually PVC pipe instead of a metal flue, and they produce water that must drain properly. If the new furnace can’t reuse the existing venting, cost goes up. Ask whether the proposal includes all venting, combustion-air, and condensate drainage work.
5. Ductwork and Airflow
A new furnace still relies on your ducts to deliver heat. If ducts are damaged, undersized, or poorly connected, the contractor may recommend changes. Not every replacement needs duct work, so ask what problem was found, whether the work is required for the new equipment, and how much of the price it accounts for.
6. Gas-Line, Electrical, and Controls
A replacement may need updates to gas piping, electrical connections, breakers, thermostats, or control wiring. These can add cost even on a straightforward swap, so the estimate should say clearly whether they’re included.
7. Access and Installation Difficulty
A furnace in an open utility room is easier to replace than one in a tight attic, crawlspace, or closet. Cramped spaces, platform changes, or venting reroutes add labor.
Comparing Furnace Quotes?
Our free Before You Hire Home Repair Cost Checklist helps you line up estimates side by side, spot missing line items, and ask the right questions before you sign.
Why Two Furnace Quotes Can Be Thousands of Dollars Apart
A lower quote isn’t necessarily incomplete, and a higher quote isn’t necessarily better, but they may cover different equipment and work. One estimate may be a standard-efficiency furnace reusing most of the existing setup. Another may include a high-efficiency model, new venting, a thermostat upgrade, duct changes, permits, and disposal of the old unit.
A useful furnace estimate should list:
- Furnace brand, model, and heating capacity (BTUs)
- Fuel type and AFUE rating
- Labor for removal and installation
- Any venting, condensate, gas-line, or electrical work
- Thermostat and duct changes
- Permits, inspections, and disposal of the old furnace
- Manufacturer and labor warranty details
If one proposal is much cheaper, find the missing difference before assuming you’ve found a bargain.
Should You Replace the AC at the Same Time?
If your central air conditioner shares the furnace’s indoor blower and ductwork, some homeowners replace both together, especially when both are aging. It can simplify matching equipment and may save on combined labor. HomeGuide puts a combined furnace-and-AC replacement at roughly $10,500 to $18,500. If your AC is still relatively young and healthy, replacing only the furnace can make more sense. For AC pricing, see our guide to AC replacement cost.
Should You Repair the Furnace or Replace It?
A replacement quote often comes right after a breakdown or an expensive repair estimate. Age alone rarely decides it. ENERGY STAR suggests considering replacement when a furnace is more than about 15 years old, especially if it needs frequent repairs, energy bills are rising, or rooms aren’t staying comfortable.
Carrier cites a common guideline: when a major repair approaches about half the cost of a new furnace, replacement deserves a closer look. That’s a guideline, not a rule. A modest repair on a furnace in good condition can still make sense. Replacement is easier to justify when the furnace is older, repairs are frequent, a major part has failed, or the technician finds a safety or combustion problem.
Safety note: If a technician mentions a cracked heat exchanger or another combustion
problem, ask them to show and explain the finding, and follow their safety guidance. Make sure you have working
carbon monoxide detectors. If a CO alarm sounds, leave the house and call 911 or your gas utility from
outside.
Tax Credits and Rebates in 2026
The federal Energy Efficient Home Improvement Credit (Section 25C), which helped with qualifying high-efficiency furnaces, ended for equipment placed in service after December 31, 2025. If you’re replacing a furnace in 2026, don’t count on that credit.
Many gas and electric utilities and some state programs still offer rebates for high-efficiency equipment. Check your utility’s website or the ENERGY STAR rebate finder, and ask your contractor which rebates the proposed furnace qualifies for. Get that in writing.
What About the 95% Furnace Efficiency Rule?
You may hear that federal furnace rules are changing. In 2023, the U.S. Department of Energy finalized a standard that would require most new residential gas furnaces to reach 95% AFUE, with compliance set for late 2028. The rule has been challenged in court. In June 2026, the Supreme Court sent the case back to a federal appeals court for reconsideration, and DOE has proposed delaying implementation while litigation continues.
For homeowners, the practical takeaway is simple: the rule does not require a 95% furnace today. Both standard and high-efficiency gas furnaces can still be installed in 2026. Ask your contractor what efficiency level they’re proposing, why it fits your home, and what installation changes a higher-efficiency model would require. Because the rule’s future is uncertain, base your decision on your home’s needs and your budget, not on predictions about the rule.
Questions to Ask Before Replacing a Furnace
- What exactly is included in this price?
- What furnace model, capacity, and AFUE rating are you proposing?
- How did you determine the heating capacity I need?
- Does the installation need new venting or condensate drainage?
- Will any gas-line or electrical work be required?
- Does the duct system need changes? If so, why?
- Are permits, inspections, and removal of the old furnace included?
- What manufacturer and labor warranties apply?
- Does this furnace qualify for any utility or state rebates?
- What could change the final price after work begins?
- If my current furnace can be repaired, how does that compare with replacing it?
Furnace Replacement: Frequently Asked Questions
How long does a furnace last?
Angi puts the average furnace lifespan at about 20 years, and many last longer with regular maintenance. ENERGY STAR suggests evaluating replacement once a furnace is about 15 years old, especially if it needs frequent repairs.
How long does furnace replacement take?
A straightforward like-for-like replacement is often done in a day. Fuel conversions, new venting, or duct changes can take longer.
Is a high-efficiency furnace worth it?
It depends on your climate, fuel prices, and how long you plan to stay. In colder areas with long heating seasons, the fuel savings from a high-efficiency furnace add up faster. Ask your contractor to estimate the difference in annual operating cost.
What size furnace do I need?
There’s no reliable square-footage shortcut. The right size depends on your climate, insulation, windows, and air leakage, and should come from a load calculation such as ACCA Manual J.
Is there a tax credit for a new furnace in 2026?
The federal 25C credit ended for equipment placed in service after December 31, 2025. Utility and state rebates may still be available in your area.
The Bottom Line on Furnace Replacement Cost
For planning, roughly $3,500 to $7,500+ is a useful range for many standard furnace replacements. Natural gas systems commonly land around $3,800 to $12,000, and high-efficiency models or complicated installations can reach about $12,000 or more.
The final price depends on much more than the furnace itself. Fuel type, heating capacity, efficiency, venting, ducts, gas or electrical work, permits, and access all change the project. Before approving a replacement, make sure you understand what equipment is being installed, how it was sized, what the estimate includes, and why any extra work is needed.
Get the Free Before You Hire Checklist
Download our free Before You Hire Home Repair Cost Checklist. Use it to compare furnace quotes, catch missing line items, and decide with confidence.
Sources
- Angi: How Much Does a New Furnace Cost? (2026 Data)
- HomeGuide: How Much Does a New Furnace Cost?
- HomeGuide: How Much Does a Gas Furnace Cost?
- Carrier: Furnace Repair vs. Replacement
- ENERGY STAR: When Is It Time to Replace?
- ENERGY STAR: Furnace Tax Credits
- ACCA: Manual J Residential Load Calculation
- ACHR News: 95% Furnace Efficiency Rule to Get New Hearing (2026)
House Care
Compass provides general educational information to help homeowners better understand repair and replacement decisions.
Cost figures are national planning estimates and will vary by location, home, and contractor. For advice about your
specific home or project, consult an appropriately qualified professional.
Roof Leak Repair: Possible Causes, Warning Signs, and What to Do Next

Last updated: September 2026
A roof leak can start as a small ceiling stain and turn into a much bigger problem if water keeps getting in. The tricky part is that where you see water inside isn’t always directly below where it entered the roof. Water can travel along roof decking, rafters, insulation, or pipes before it shows up on a ceiling or wall.
This guide covers the most common causes of roof leaks, the warning signs to watch for, what to do right away, and what a repair may cost.
Quick Answer: What to Do About a Roof Leak
- Protect the inside first. Move belongings, catch drips, and stay away from wet areas near electrical fixtures.
- Document it. Take photos and note when the leak happens (every rain, only heavy or wind-driven rain).
- Don’t climb on the roof. Look from the ground, and check the attic only if it’s safe to do so.
- Have the source evaluated. The stain you see may be several feet from where water is getting in.
- Know the likely cost: many leak repairs run about $150 to $1,200, while large leaks with decking or interior damage can reach $3,000 or more (HomeGuide).
Common Causes of Roof Leaks
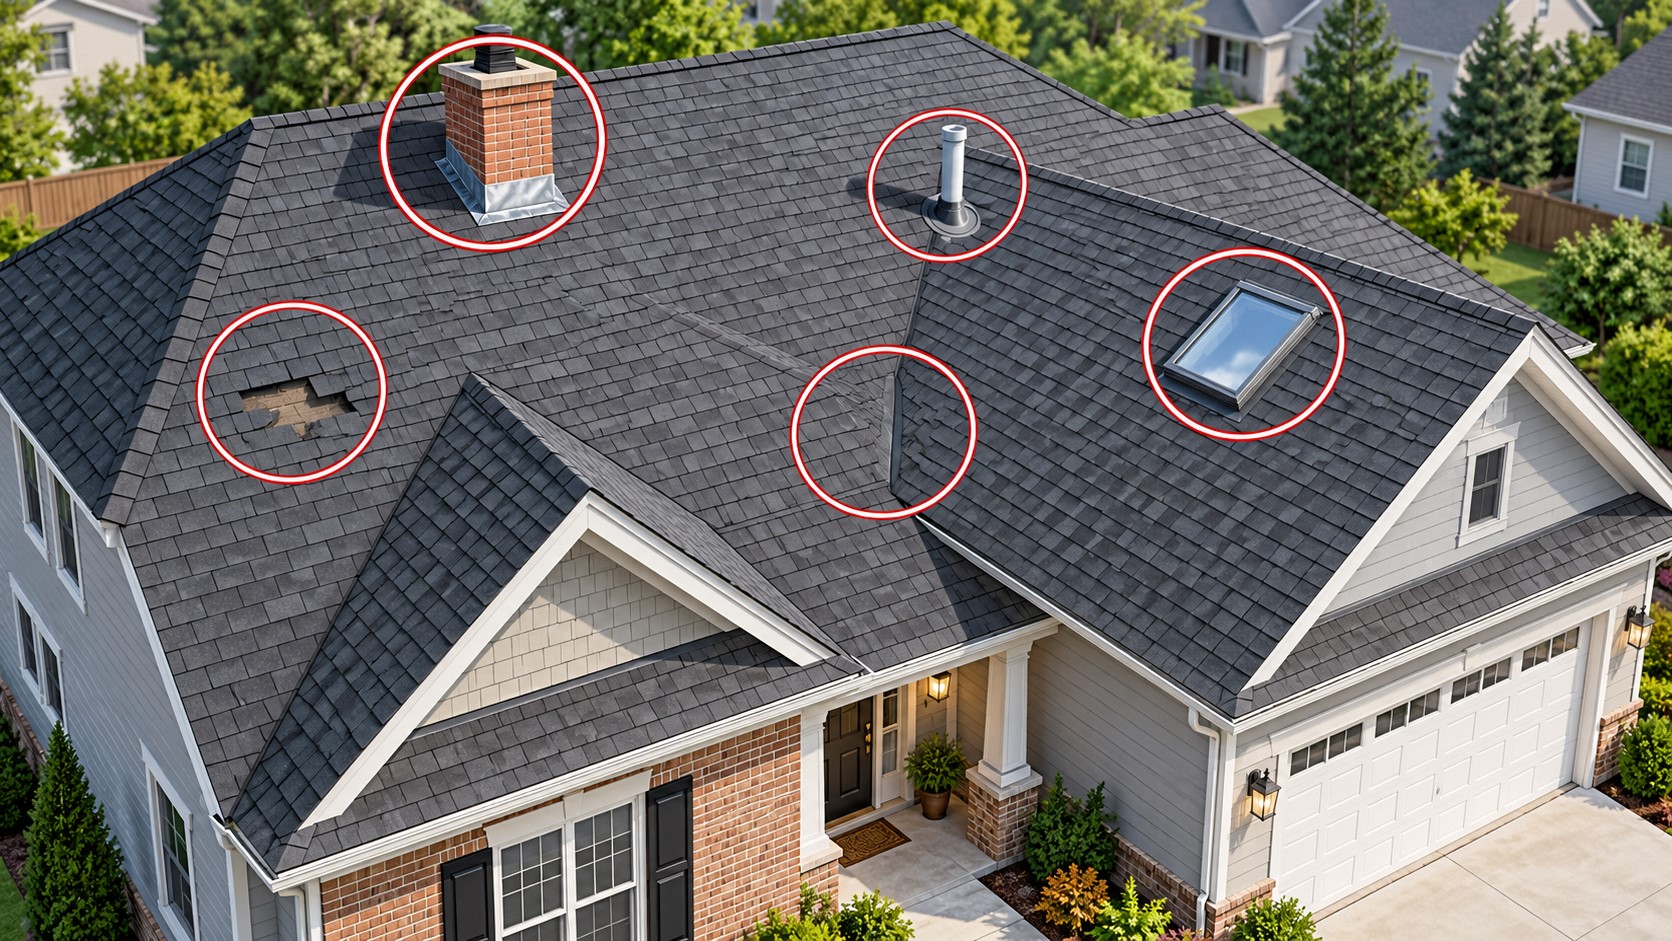
Roof leaks usually start where roofing materials are damaged, worn, or interrupted by something that passes through the roof. These are the most common trouble spots:
- Damaged or missing shingles. Cracked, curled, torn, or missing shingles expose the layers underneath to wind-driven rain. Smaller defects can be hard to see from the ground.
- Failed flashing. Flashing is the metal or waterproofing material where the roof meets walls, chimneys, skylights, and vents. When it loosens, corrodes, cracks, or was installed incorrectly, water can get in at those joints.
- Vents, pipes, chimneys, and skylights. Every opening in the roof has to shed water correctly. Cracked rubber pipe boots, worn sealant, or damaged flashing around these spots are frequent leak sources.
- Roof valleys. Valleys carry a lot of runoff where two roof slopes meet. Damage, debris, or poor installation there can create a leak path.
- Wind, hail, or storm damage. Wind can lift or tear off shingles and flashing. Hail and falling branches can cause damage that isn’t obvious from the yard.
- Aging materials. As roofing weathers, shingles may crack, lose granules, or turn brittle, and older sealants and flashing can break down.
- A moisture source that isn’t the roof. Not every ceiling stain is a roof leak. Plumbing leaks, HVAC condensation, bathroom exhaust problems, or attic condensation can look similar.
Warning Signs You May Have a Roof Leak
A leak is sometimes obvious during a storm, but many show up through secondary signs first. Watch for:
- Brown, yellow, or gray stains on ceilings or upper walls
- Bubbling, peeling, or blistering paint or drywall
- Damp insulation or visible moisture in the attic
- Dark staining on roof decking or rafters
- A musty odor in the attic or an upstairs room
- Dripping water during or shortly after rain
- Missing, cracked, or lifted shingles visible from the ground
- Damaged flashing or gaps around a chimney, skylight, vent, or pipe
- Sagging or softened ceiling material
The U.S. Environmental Protection Agency advises homeowners not to ignore wet spots or water stains, and to fix moisture problems promptly. Wet materials should be dried quickly, because ongoing moisture can lead to mold and damage building materials.
What to Do When You First Notice a Roof Leak
1. Protect the Interior
If water is actively dripping, move furniture, electronics, and rugs away from the area if you can do so safely. Use a bucket or container to catch drips, and protect nearby floors and finishes.
2. Document What You See
Photograph stains, drips, damaged finishes, and any exterior damage you can safely see from the ground. Note whether the leak happens during every rain, only heavy rain, or only wind-driven rain from a certain direction. That information can help a roofer narrow down the source, and photos can help if you file an insurance claim.
3. Check the Attic Only If It’s Safe
If you can get into the attic safely, look for damp insulation, water stains, wet decking, or signs that water has traveled along the framing. Use good lighting, stay on the joists or a walkway, and never step onto insulation or drywall between joists.
4. Get the Leak Evaluated
A qualified roofer can check likely entry points and tell you whether the problem is one localized spot or part of a broader roofing issue. If the leak is active or the ceiling is sagging, treat it as urgent. If a permanent repair can’t happen right away, ask about emergency tarping, which HomeGuide puts at roughly $175 to $700.
Don’t Assume the Ceiling Stain Shows Where the Roof Is Leaking

One of the most confusing parts of roof leak repair is that water moves. Rain can enter around flashing or a vent, run along the underside of the roof deck or a rafter, and then drip several feet away from where it came in. Insulation can also soak up and spread moisture.
That’s why simply patching the roof directly above a ceiling stain can miss the real problem. Finding the source may require examining the roof surface together with the attic or underside of the roof deck.
Why an Attic Inspection Helps
When attic access is safe and practical, the underside of the roof can show valuable evidence: moisture stains, damp insulation, darkened decking, ventilation problems, or water tracks that point to the leak’s path. It won’t reveal every hidden defect, though. Some damaged decking isn’t visible until shingles and underlayment are removed.
Ask your roofer whether they’ll check the attic or underside of the roof deck if it’s safely accessible, and how any hidden decking damage will be handled and priced if they find it.
When a Roof Leak Needs Urgent Attention
Call for professional help right away if:
- Water is coming in near light fixtures, wiring, or an electrical panel
- The ceiling is bulging, sagging, or heavily saturated
- Water is coming in over a large area rather than one spot
- The leak started after major wind, hail, or a falling tree
- You see a sagging roof area or damaged framing
- The leak keeps coming back after previous repairs
Safety note: If water is near electrical equipment or you’re unsure whether an area is
safe, stay out of the wet area and get professional help. Water and electricity are a dangerous combination.
What Does Roof Leak Repair Cost?
Cost depends on what’s causing the leak and how far the water has spread. HomeGuide’s national data breaks leak repairs down by severity:
| Leak Severity | Typical Repair Cost |
|---|---|
| Small leak, limited damage | $150 – $500 |
| Average leak | $500 – $1,200 |
| Large leak or multiple entry points | $1,200 – $3,000 |
| Emergency tarping (temporary) | $175 – $700 |
Source: HomeGuide national cost data. Repairs to drywall, insulation, or framing inside the home are usually extra.
A simple fix like replacing a cracked pipe boot or resealing flashing is often at the low end. Leaks that have soaked the decking or damaged ceilings cost more. For a full breakdown of shingle, flashing, and decking repair prices, see our guide to roof repair cost. If the roof is older and leaking in several places, compare repair quotes with our guide to roof replacement cost.
Hiring a Roofer? Don’t Go In Blind
Our free Before You Hire Home Repair Cost Checklist helps you compare roofing estimates, spot missing line items, and ask the right questions before you approve a repair.
Should You Get on the Roof to Find the Leak?
Usually, no. A wet or storm-damaged roof is a dangerous place for an untrained homeowner. Roof work carries serious fall risk, and even professional roofers are required to plan for fall protection. From the ground, you may be able to spot missing shingles, displaced flashing, or fallen branches without climbing up. If the roof is steep, wet, icy, or damaged, leave the roof-level inspection to someone trained and equipped to do it safely.
Can a Roof Leak Cause Mold or Interior Damage?
Yes. A roof leak can soak insulation, drywall, wood framing, and ceilings. The EPA identifies moisture control as the key to preventing indoor mold and recommends drying wet or damp materials within about 24 to 48 hours when possible. The longer water keeps coming in, the more likely repairs will expand beyond the roof itself.
Fixing the visible stain without stopping the water source doesn’t solve the problem.
Will Homeowners Insurance Cover a Roof Leak?
It depends on the cause. Insurance may help when a leak results from a sudden, covered event such as wind, hail, or a fallen tree. It typically doesn’t cover leaks caused by age, wear and tear, or lack of maintenance. If storm damage may be involved, take photos, prevent further damage if you can do so safely, and contact your insurer before permanent repairs begin.
Questions to Ask About a Roof Leak Repair
- Where do you believe the water is getting in, and what evidence points there?
- Is this one localized problem, or are there signs of broader roof wear?
- Will you check the attic or underside of the roof deck if it’s safely accessible?
- Do you see moisture staining, ventilation problems, or decking damage?
- Could hidden decking damage show up once shingles are removed?
- If hidden damage is found, how will extra work be priced?
- Which roofing materials and flashing will be repaired or replaced?
- Is this a permanent repair or a temporary fix?
- What warranty applies to the repair?
Repairing the Leak Is Only Part of the Job
A complete roof leak repair has two parts: stop the water from getting in, and deal with the moisture that already got in. Once the roof is fixed, wet insulation, drywall, or ceilings may still need drying, repair, or replacement depending on how much water came in and how long it stayed wet.
If the same area has leaked more than once, ask whether previous repairs fixed the actual entry point or only the visible symptom.
Roof Leak Repair: Frequently Asked Questions
Can a roof leak be fixed from the inside?
Not permanently. You can catch drips and protect belongings from inside, but the actual repair has to happen where water enters the roof.
Why does my roof only leak in heavy rain?
Leaks that appear only in heavy or wind-driven rain often point to flashing, vents, valleys, or lifted shingles that let water in only when it’s pushed sideways or runoff is heavy. Note the conditions and share them with your roofer.
Is a roof leak an emergency?
An active leak near electrical fixtures, a sagging ceiling, or widespread water intrusion should be treated as urgent. A small, old stain that isn’t growing is less urgent but should still be checked soon.
Does a leak mean I need a new roof?
Not necessarily. Many leaks come from one failed spot, like flashing or a pipe boot, and can be repaired. Multiple leaks on an aging roof may make replacement worth comparing.
The Bottom Line
A roof leak is a symptom, not a diagnosis. Missing shingles may be the cause, but so can failed flashing, roof openings, storm damage, aging materials, drainage problems, or even a moisture source that isn’t the roof at all.
Protect the interior, document the damage, skip the ladder, and have the source evaluated before assuming you know where the water is coming in. Catching a leak early can limit how much roofing and interior repair you’ll need later.
Get the Free Before You Hire Checklist
Download our free Before You Hire Home Repair Cost Checklist. Use it to compare roofer quotes, catch missing line items, and avoid costly surprises.
Sources
- GAF: How to Identify and Repair Roof Leaks
- GAF: How to Identify Roof Damage
- U.S. EPA: A Brief Guide to Mold, Moisture and Your Home
- U.S. EPA: Mold Course, Chapter 9 (Prevention)
- U.S. OSHA: Fall Prevention Resources
- HomeGuide: Roof Shingle Repair Cost
House Care
Compass provides general educational information to help homeowners better understand repair and replacement decisions.
It does not diagnose specific problems. For advice about your specific home or project, consult an appropriately qualified
professional.